LIVE User Guide
Overview
Studio Live is the live production control environment inside Frequency Studio, designed to power everything from continuous 24/7 channels to high-profile, one-time events. It combines real-time live source control, ad break insertion, dynamic graphics integration, and broadcast-grade redundancy — all in a single web-based interface.
Built on technology proven across thousands of live sports, news, and entertainment events, Studio Live helps operators deliver professional, low-latency streams with precision timing, flexible switching, and monetization tools built for the demands of live programming.
Studio Live Benefits
Integrating Studio Live into your workflow offers measurable improvements in engagement, revenue, efficiency, and reliability.
Mixed Content
Enhance your channel’s existing programming with high value live events to increase audience engagement.
Responsiveness
React instantly to breaking stories, live play changes, or unexpected developments with ad-hoc source switching and manual overrides.
Monetization During Live
Trigger mid-stream ad breaks on demand, sync to SCTE-35 cues, and combine with branded overlays for premium sponsorship opportunities.
Operational Resilience
Multi-region failover, automated redundancy, and an isolated DR stack ensure streams remain live even in the face of equipment or network failures.
Editorial Control
Choose between automated scheduling for 24/7 feeds or fully manual operation for event coverage where timing changes in real time.
Getting Started
Before running live events in Studio Live, it’s important to understand the three main stages of the workflow:
Setup - Configure Live Sources from remote or local sources.
Execution & Control - Switch between sources, insert ads, and add graphics.
Delivery & Monitoring - Output to multiple channels, monitor health, and trigger overrides, if needed.
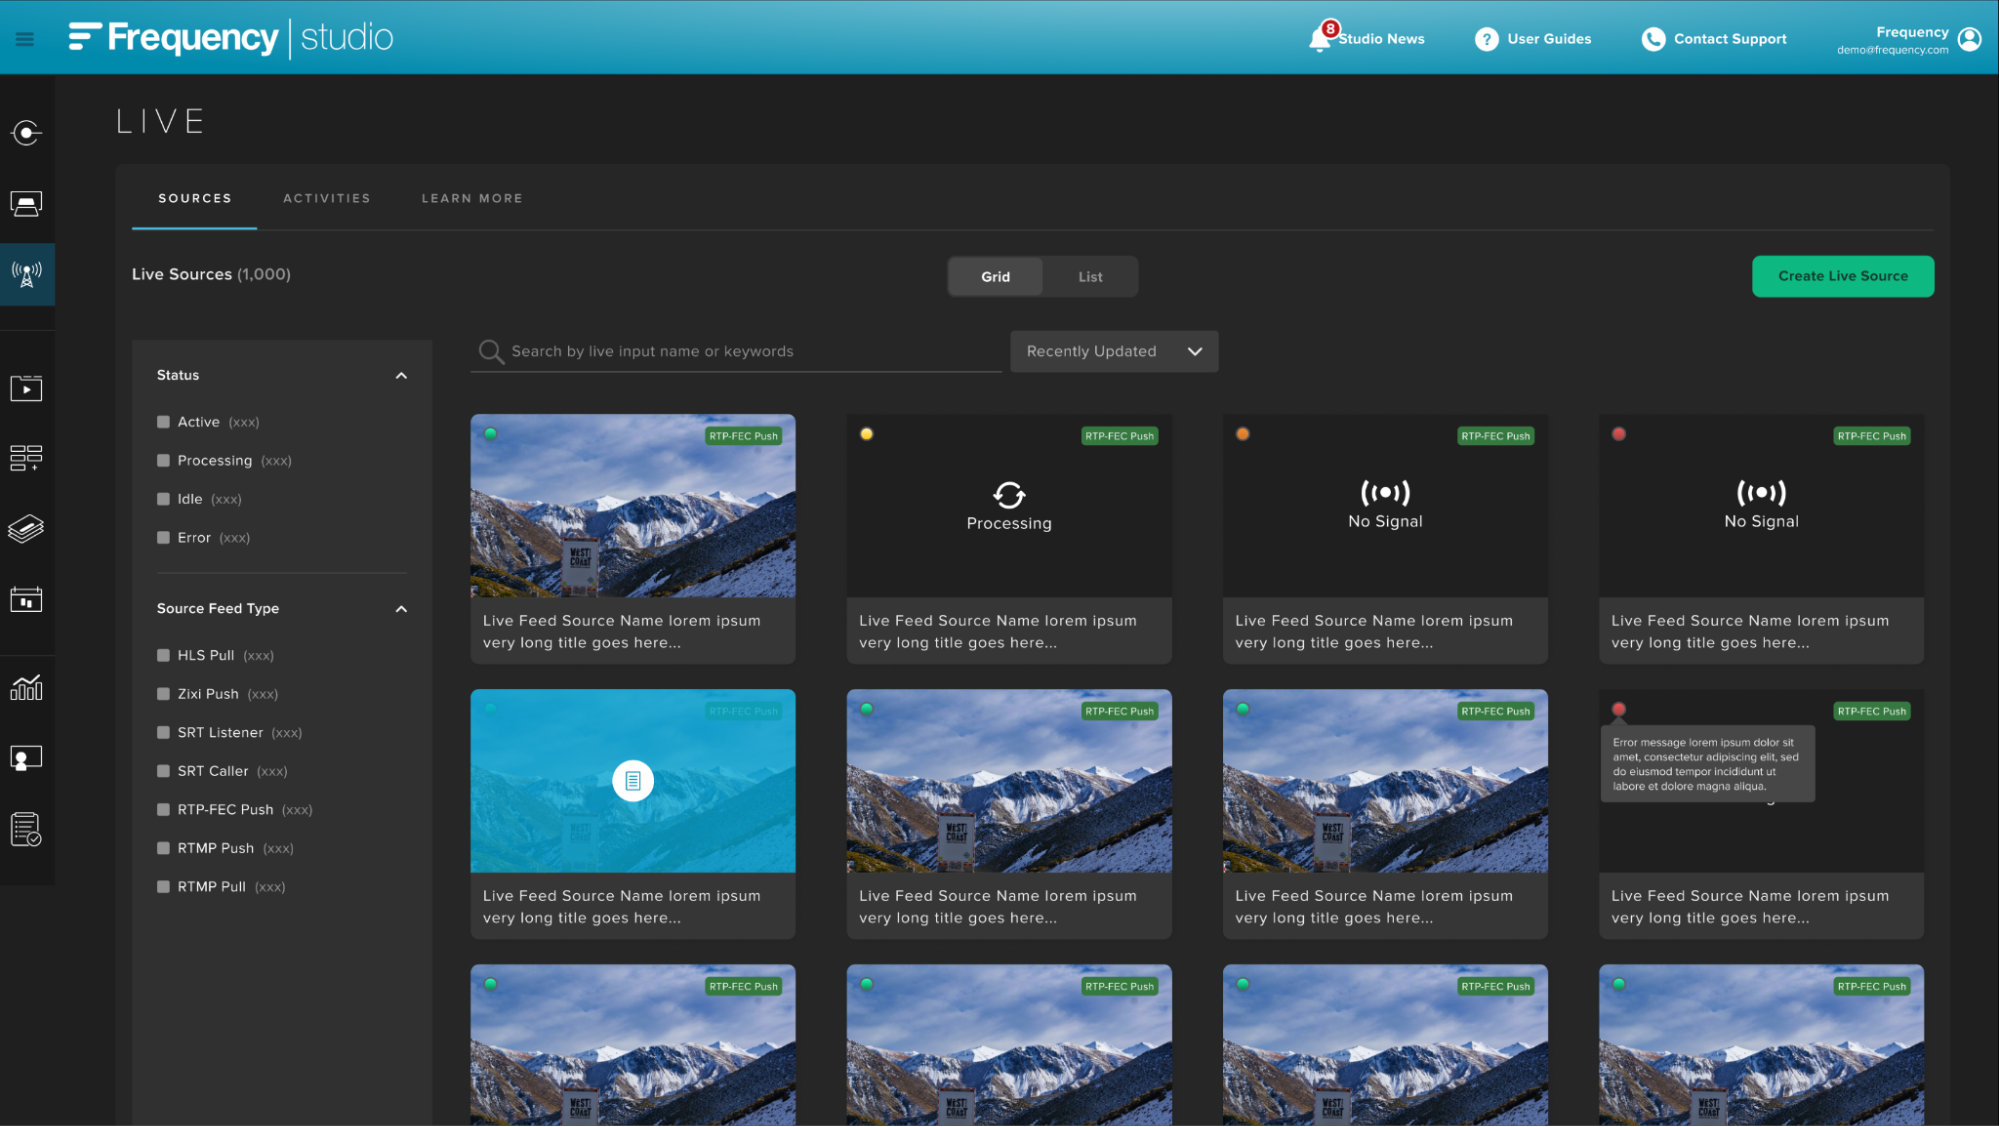
Set Up Live Sources
In the Live tool, set up one or more Live Sources by clicking on "Create Live Source":
Choose the desired Live Source Type:
Studio Live supports multiple contribution protocols for flexibility and resilience. After naming and describing your Live Source, choose from one of the many supported protocols, based on your needs.
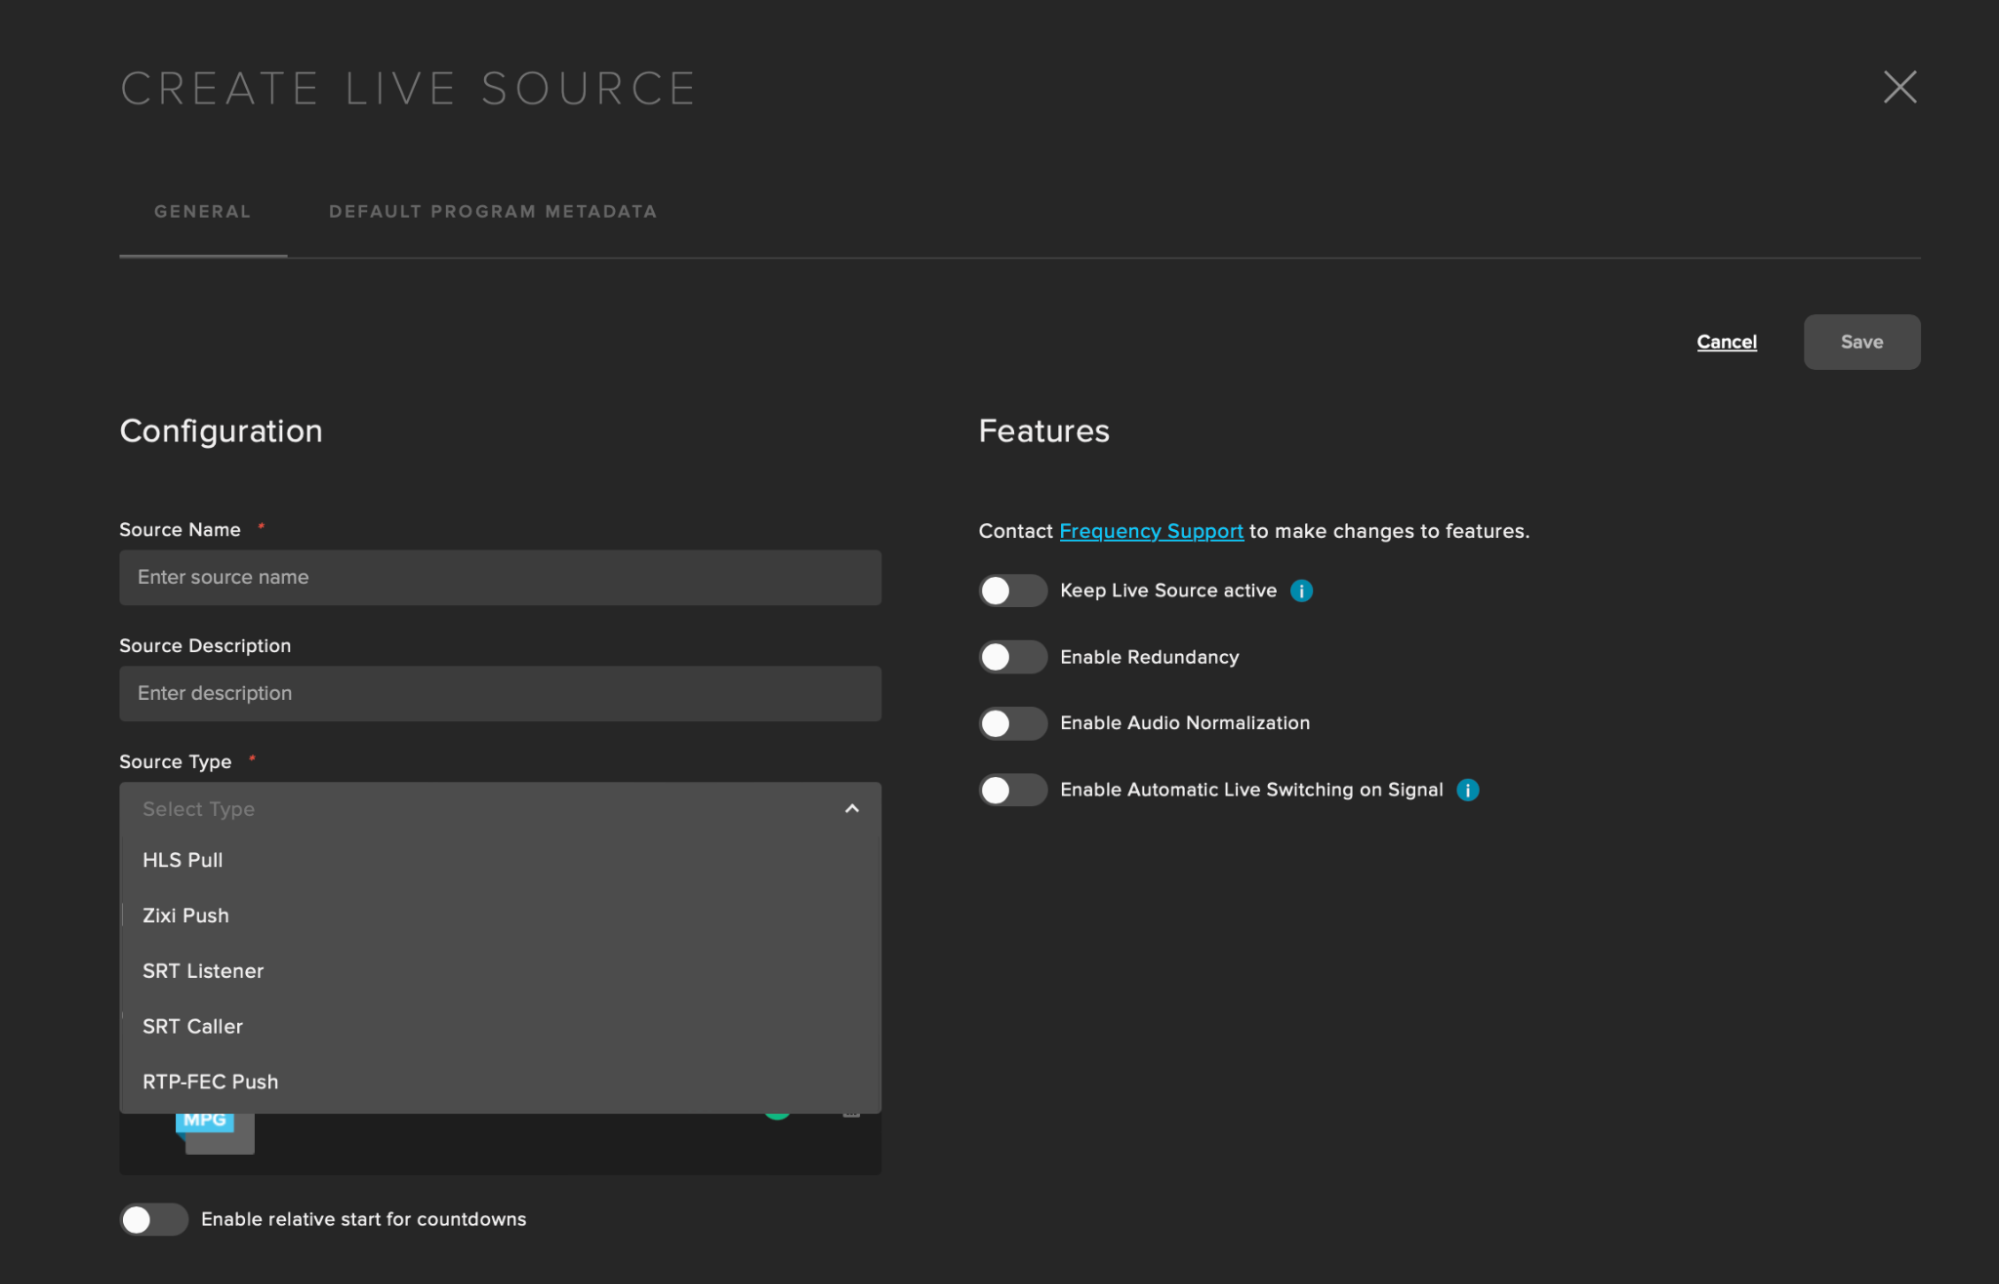
Supported Protocols:
HLS - Simple setup through a URL.
Zixi - Reliable transport with packet recovery for unstable networks.
SRT - Secure, low-latency contribution over public internet.
RTP-FEC - Forward error correction for high-quality delivery.
RTMP - Widely supported for broadcast and web streaming.
Configure your Live Source:
Live Source Types
Source Name (required): A user-defined name to easily identify this live source.
Source Description: A more detailed description for internal reference.
Ad Slate: A fallback file that will play during SCTE-35 ad insertions on the stream whenever ads are not filled. Use of a channel branded asset with some degree of motion or audio is recommended.
1. HLS Pull
A reliable HTTP input stream that has various renditions, segments and metadata pulled from the stream, but may feature higher latency (Up to 30+ seconds) than other protocols.
Input URL (required): The full URL to the HLS master manifest file (typically ending in .m3u8).
SCTE-35 Source: Specifies where to look for SCTE-35 ad insertion markers.
Segments: Use SCTE-35 signals embedded in video.
Manifest: Use SCTE-35 signals from HLS Manifest markers.
2. Zixi Push
The Zixi protocol delivers broadcast-grade, ultra-reliable video over standard internet connections, and requires specific Zixi-enabled hardware/software.
Advanced setup:
Max Bitrate (ms): The maximum buffer time Zixi can use for error correction and jitter smoothing.
Whitelist CIDR: A security feature that restricts which IP addresses are allowed to send a stream to this source. The default value of 0.0.0.0/0 allows connections from any IP address.
Decryption / Static Key / Decryption Key: Enables Zixi's built-in encryption and allows you to provide the key for decrypting the stream.
Server Address: The destination address for the Zixi stream, provided after creation.
Port: The destination port, usually 2088 for Zixi.
Stream ID: A unique identifier for the Zixi stream, used for routing and authentication.
3. SRT Listener
A server that "listens" for an incoming connection from a remote SRT encoder (which will be in "caller" mode). A low-latency stream that requires an SRT compatible encoder.
Advanced setup:
Max Bitrate (Kbps): The maximum acceptable data rate in kilobits per second for the incoming stream to prevent network overload.
Min Latency (ms): The minimum delay (buffer) in milliseconds used by the SRT protocol to retransmit lost packets. A higher value provides more reliability on poor networks but increases delay.
Whitelist CIDR: A security feature that restricts which IP addresses are allowed to send a stream to this source. The default value of 0.0.0.0/0 allows connections from any IP address.
Decryption / Decryption Key: Enables SRT's built-in AES encryption and sets the secret passphrase required to decrypt the incoming stream.
Server Address: The destination IP address or hostname provided by the platform, which you will configure in your encoder to send the stream to. This is displayed after creation.
Port (required): The specific TCP/UDP port on the server that is "listening" for the incoming stream from your encoder.
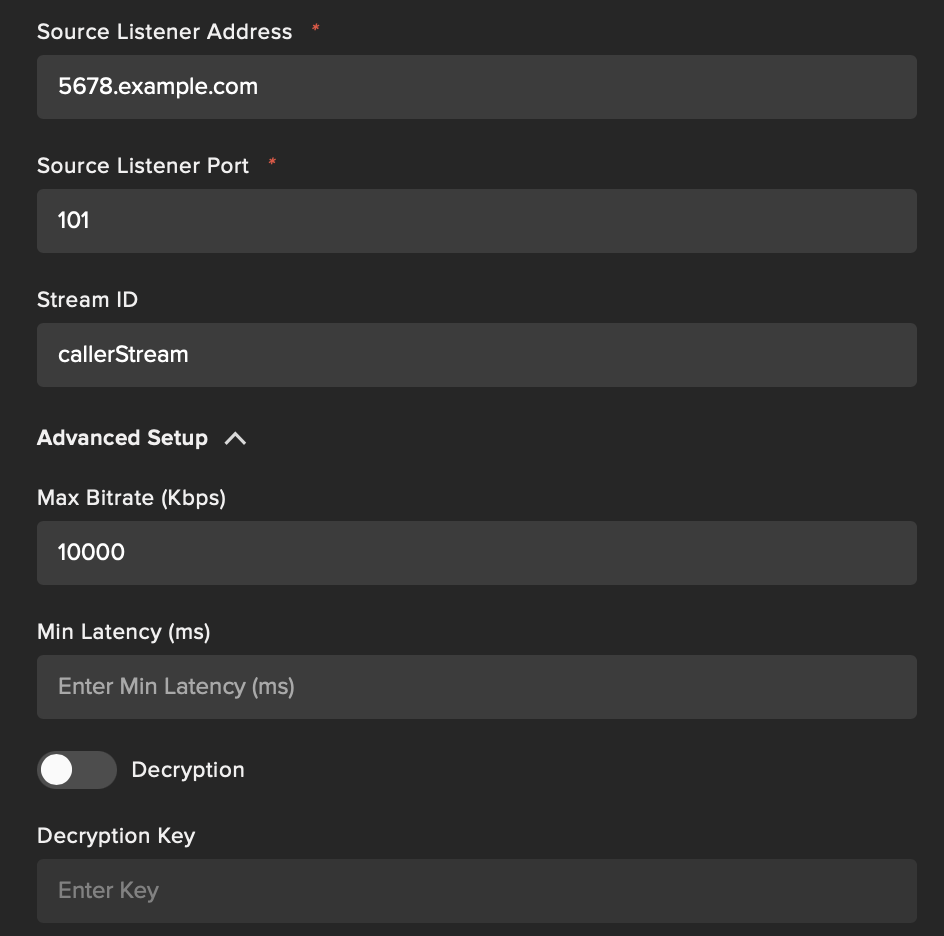
4. SRT Caller
A server actively "calls" out to initiate a connection with a remote SRT encoder (which must be in "listener" mode).
Advanced Setup:
Max Bitrate (Kbps): The maximum data rate the platform will pull.
Min Latency (ms): The latency buffer for packet recovery.
Decryption / Decryption Key: Enables and sets the password for decrypting the stream sent from the listener.
Source Listener Address (required): The public IP address or hostname of the encoder that is waiting for a connection.
Source Listener Port (required)t: The port on the remote encoder that this server should connect to.
Stream ID: An optional string used to identify or authenticate the stream.
5. RTP-FEC Push
The server accepts an incoming Real-time Transport Protocol (RTP) stream that includes Forward Error Correction (FEC) data for improved reliability.
Advanced setup:
Max Bitrate (Kbps): A data rate limit for the incoming stream.
Whitelist CIDR: A security feature that restricts which IP addresses are allowed to send a stream to this source. The default value of 0.0.0.0/0 allows connections from any IP address.
Server Address: The destination IP address provided by the platform for the encoder to push the RTP-FEC stream to. Displayed after creation.
Port: The destination port for the incoming stream.
6. RTMP Push
The server provides an ingest point where a remote encoder can "push" a stream using the widely supported RTMP protocol.
Server Address: The RTMP ingest URL provided by the platform (e.g., rtmp://ingest.server.com/live). Will be displayed after creation.
Port: The port for the RTMP connection, typically 1935. This field will be provided after creation.
Stream Key: A unique, secret string of characters that acts as a password to identify and authenticate your specific stream when it arrives at the server.
7. RTMP Pull
The server will actively connect to a remote RTMP source URL and "pull" the live stream from it.
Input URL: The full RTMP URL of the source stream to connect to (e.g., rtmp://source.server.com/app/streamName).
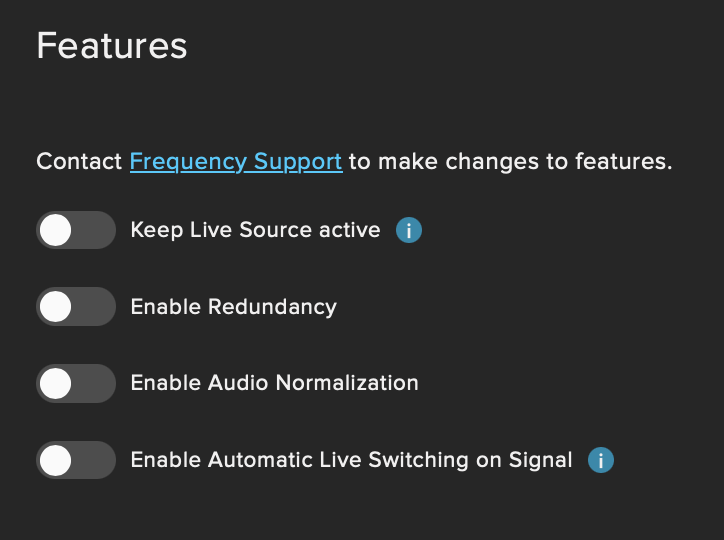
Live Source Features
Request optional Live Source Features from Frequency Support.
Keep Live Source Active: This feature ensures that the Live Source never becomes Idle. It is ideal for breaking news channels.
Enable Redundancy: In case of Live Source Failure, your channel won’t go dark.
Enable Audio Normalization: Both US and EU standards are supported.
Enable Automatic Live Switching on Signal: Instead of switching manually or according to your schedule, we support Live Switching on Signals in your feed.
Configure Default Program Metadata
Configure Default Program Metadata to minimize operational burden when programming. Default program metadata is used to pre-fill Live Program metadata during scheduling when the Live Source is selected:
Title
Description
Country of Origin
Parental Rating
Genre
Language
Custom Metadata
Artwork

Manage Live Events
Studio Live supports both automated and manually controlled live events, allowing varying levels of direct control over the Live experience for a channel.
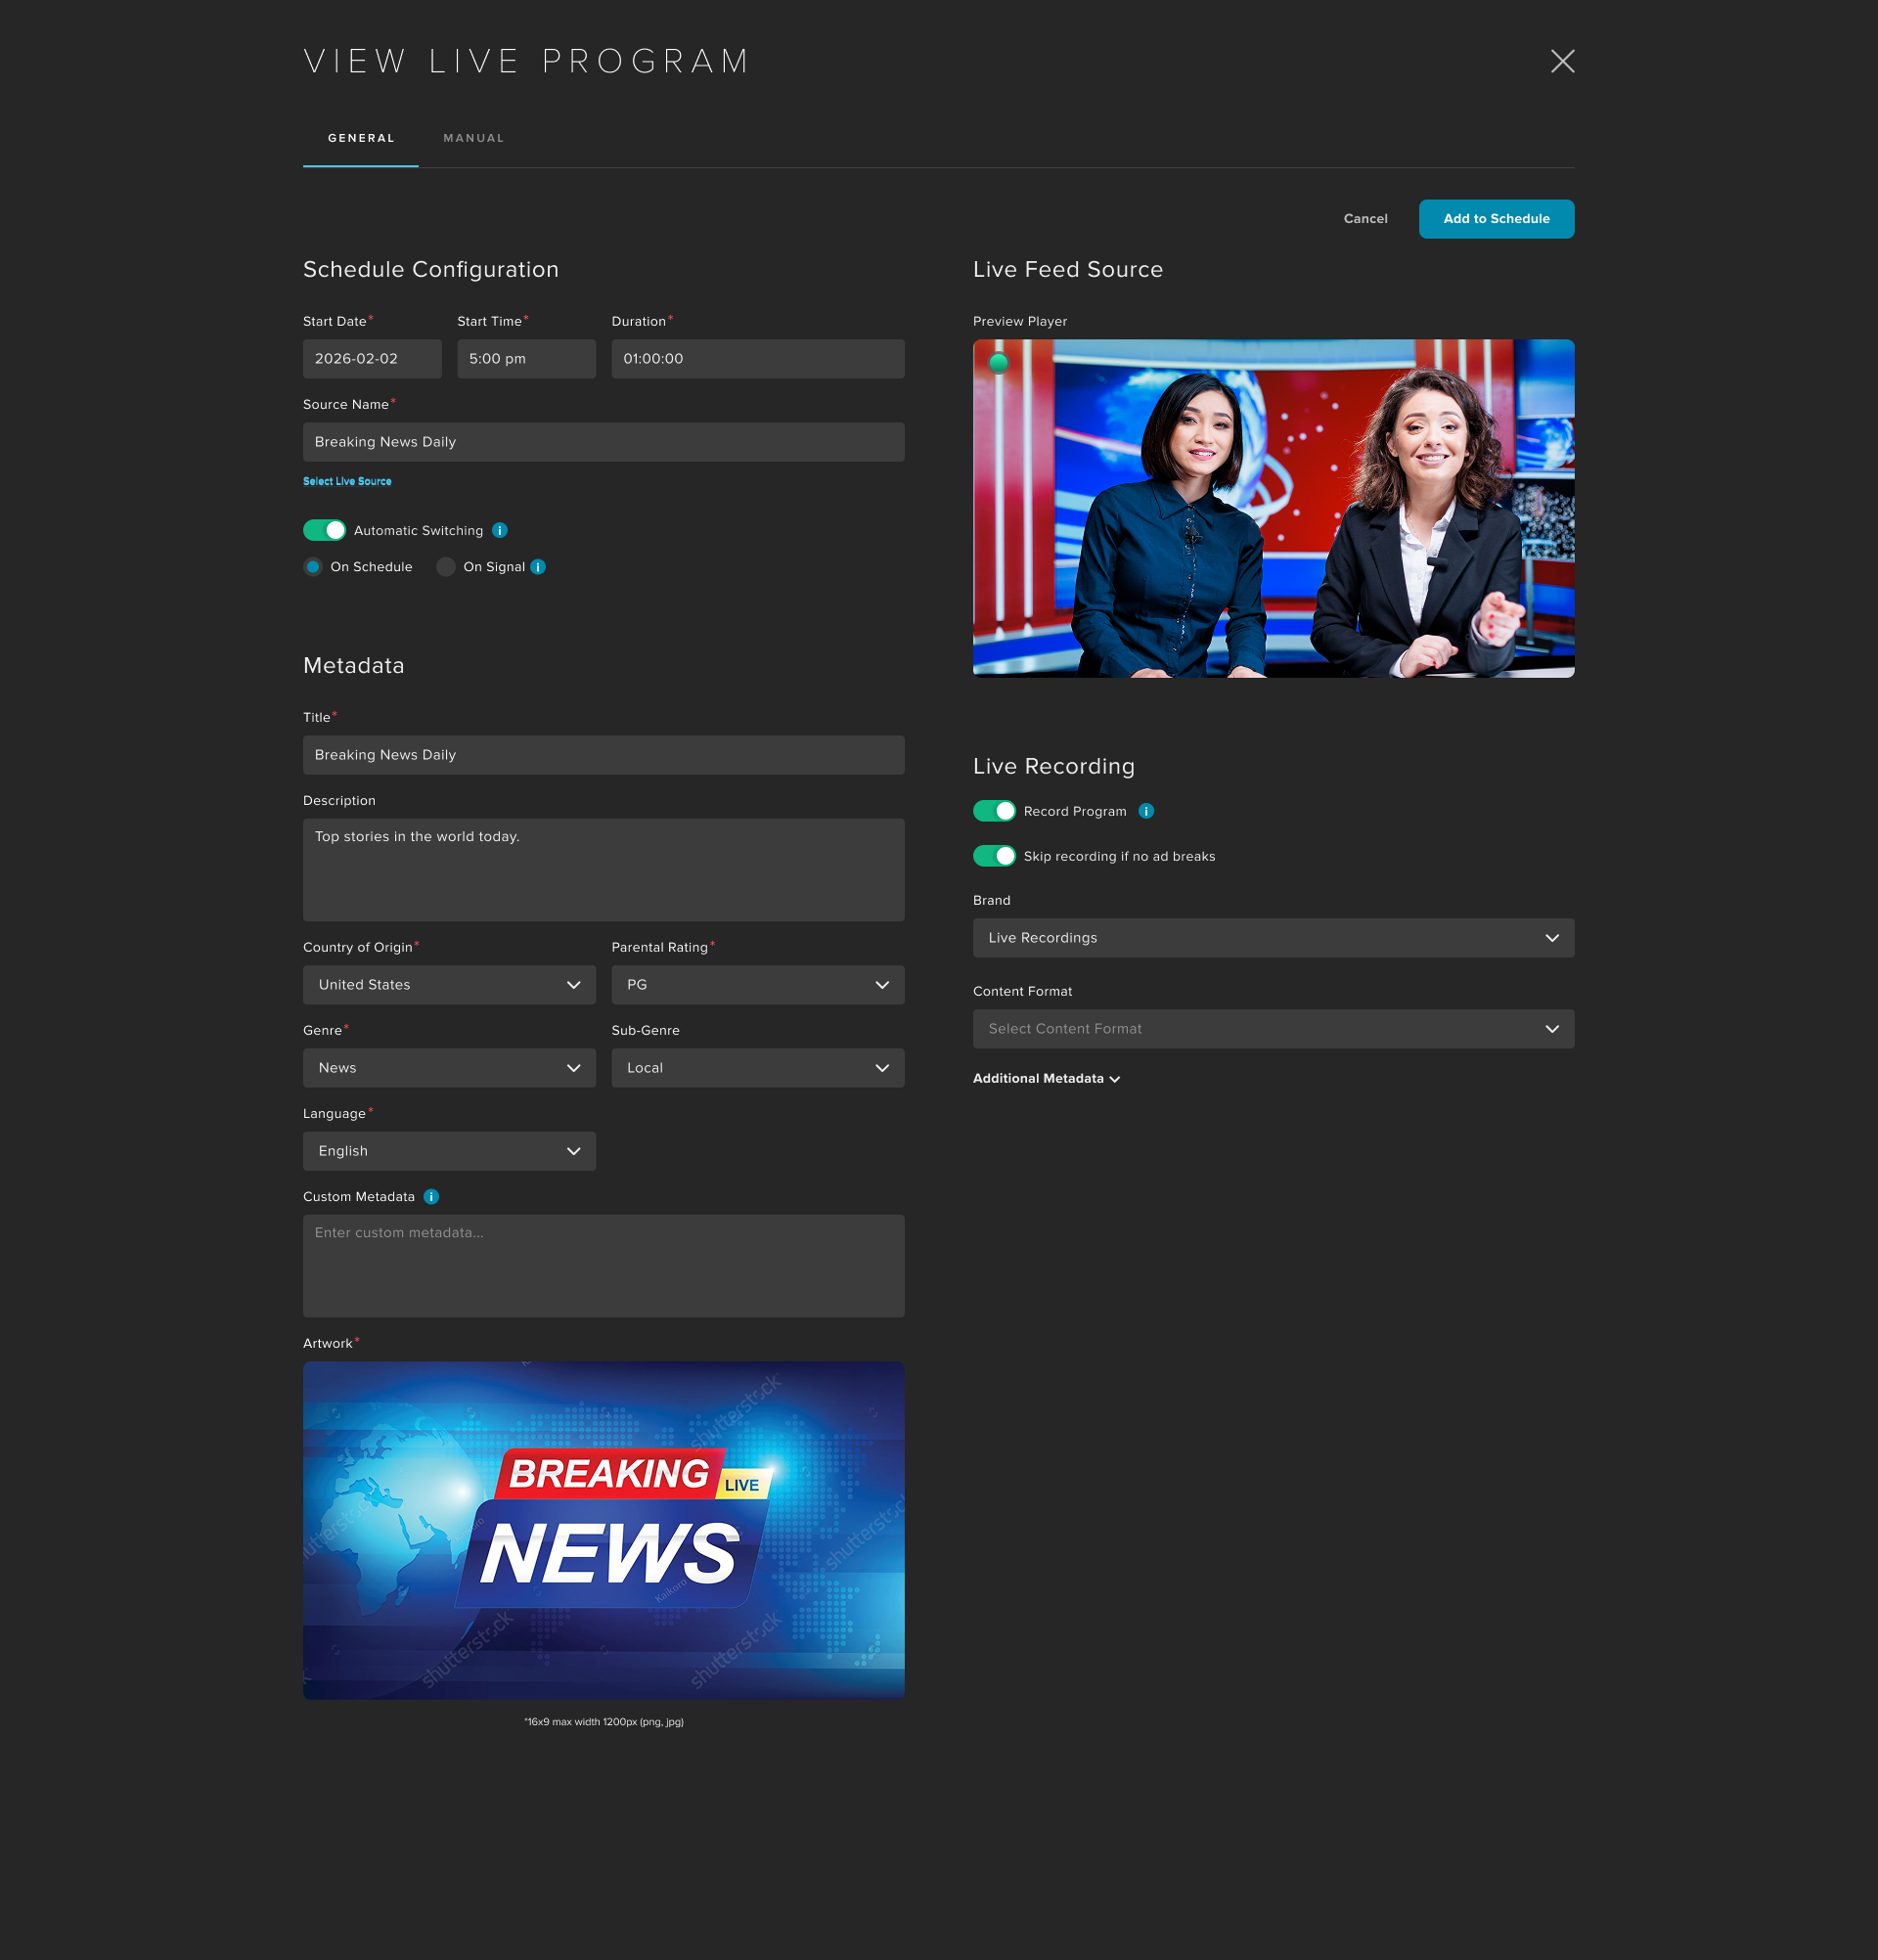
Live Event Schedule Configuration
When setting up a live event, there are a variety of configuration and metadata options available in how the event is triggered.
Start Date / Start Time: Select the date and time for a stream.
Duration: Select the intended length of the stream
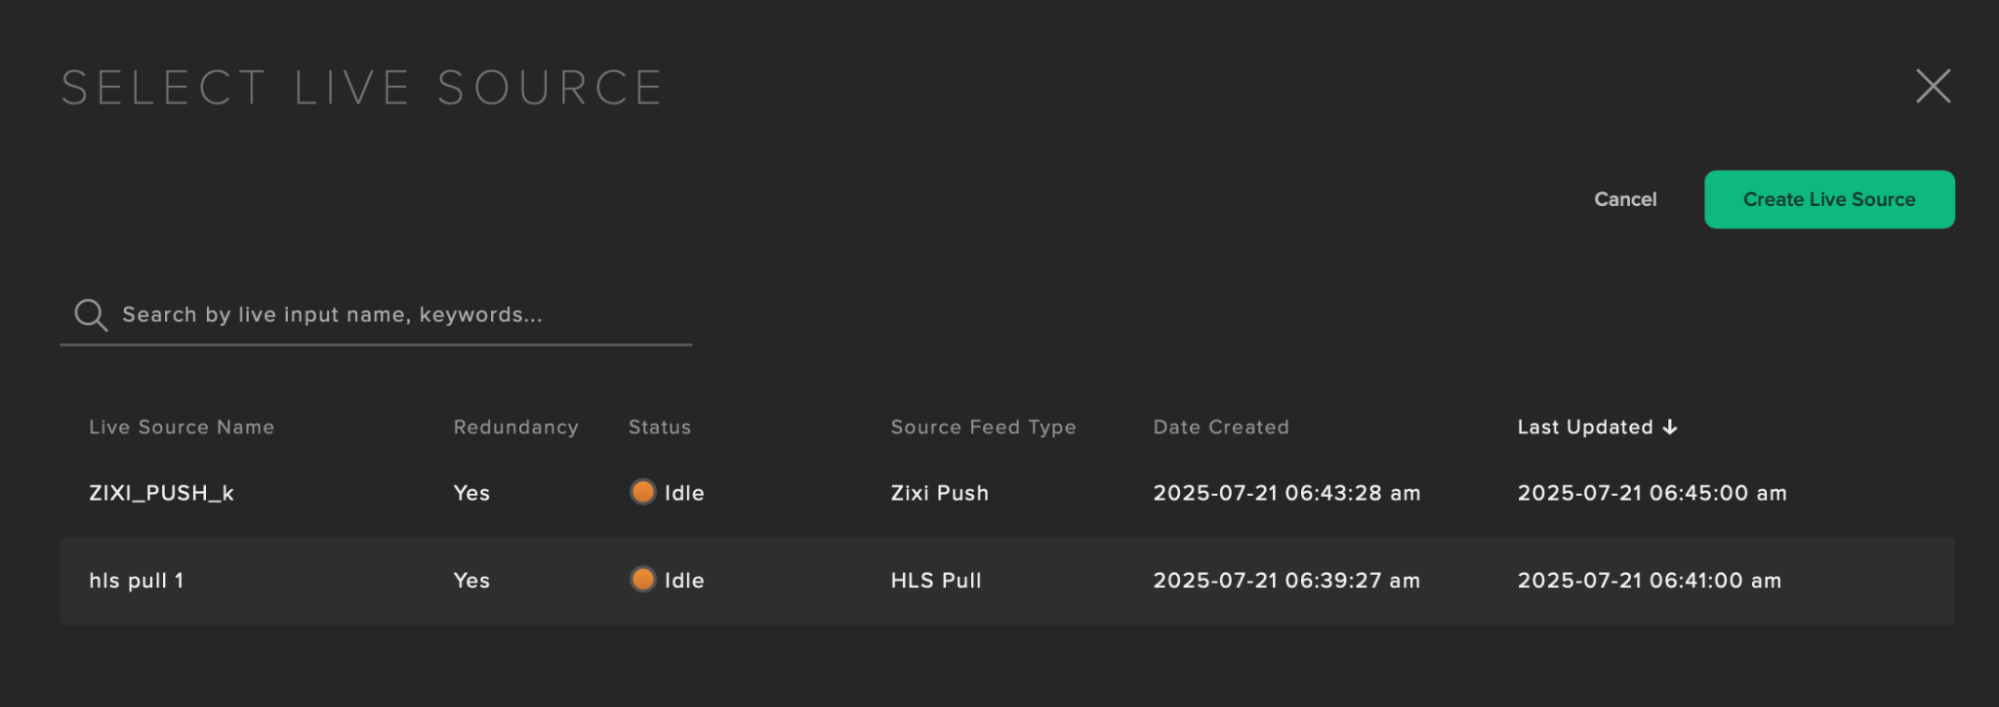
Live Source Name: Select from your list of Idle or Active Live Sources
Switch to Live Automatically: If automatic switching is selected, please choose to switch to the Live source signal as scheduled or on signal. If automatic switching is turned off, you must use the manual switch tab to perform start and end of the Live broadcast.
As Scheduled / On Signal: If On Signal is selected, it will begin when a signal is received. Otherwise, the schedule will play the stream at the scheduled start time.
Metadata: This information will be how the Live Event is displayed on EPG outputs for distributors. If default program metadata has been filled out in the Live Source, it will be inherited by default.
Title: What the program displays as on the EPG.
Description: A short description for the live event that displays on the EPG.
Country of Origin: Relates to the rating system in use and how that will display.
Parental Rating: Denotes the age recommendations for viewers.
Genre / Subgenre: The genre/subgenre combination for the content that displays on the EPG.
Custom Metadata: Flexible field that some distributors use for custom pieces of information.
Artwork: The image that displays for the program on the EPG. Multiple images can be sent where distributors require multiple (Hero images, posters, etc.).
Automated Switching
Add Live Programs to your Schedule for scheduled Live Programs.
Embed SCTE-35 cues to automate ad timing or content changes.
You can choose to start your program “On Schedule” or “On Signal”, based on your needs.
Record live events to be used as linear VOD programs in the future for replays.

Select your Live Source.
Update any Live Program details.
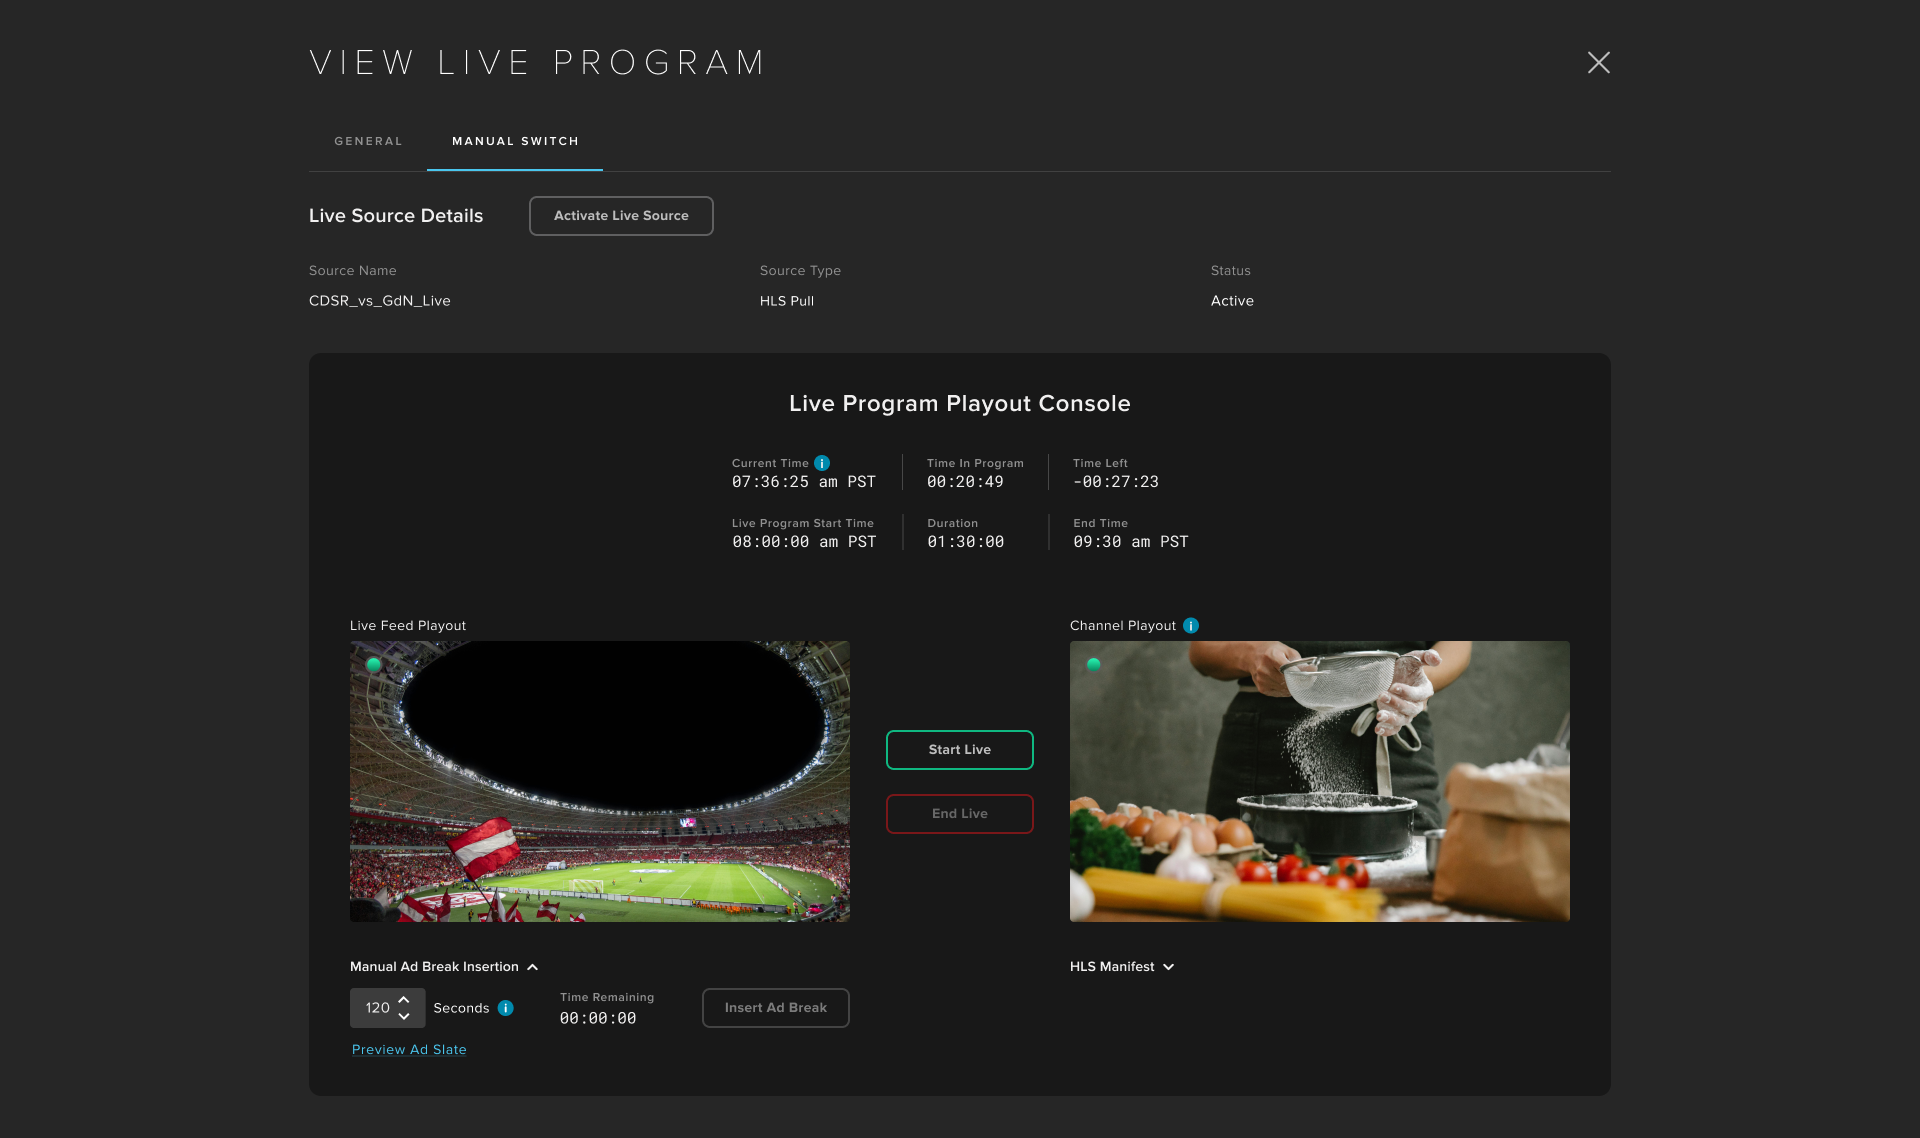
Manual Switch
When Automatic Switching is disabled, an event will require manual starting from a live source that will warm up up to an hour before the scheduled start.
Trigger live cut-ins for breaking news or urgent updates.
Manually switch sources mid-stream for editorial control.
Trigger mid-stream breaks manually with SCTE-35 signaling.
Display custom ad slates before returning to the main feed.
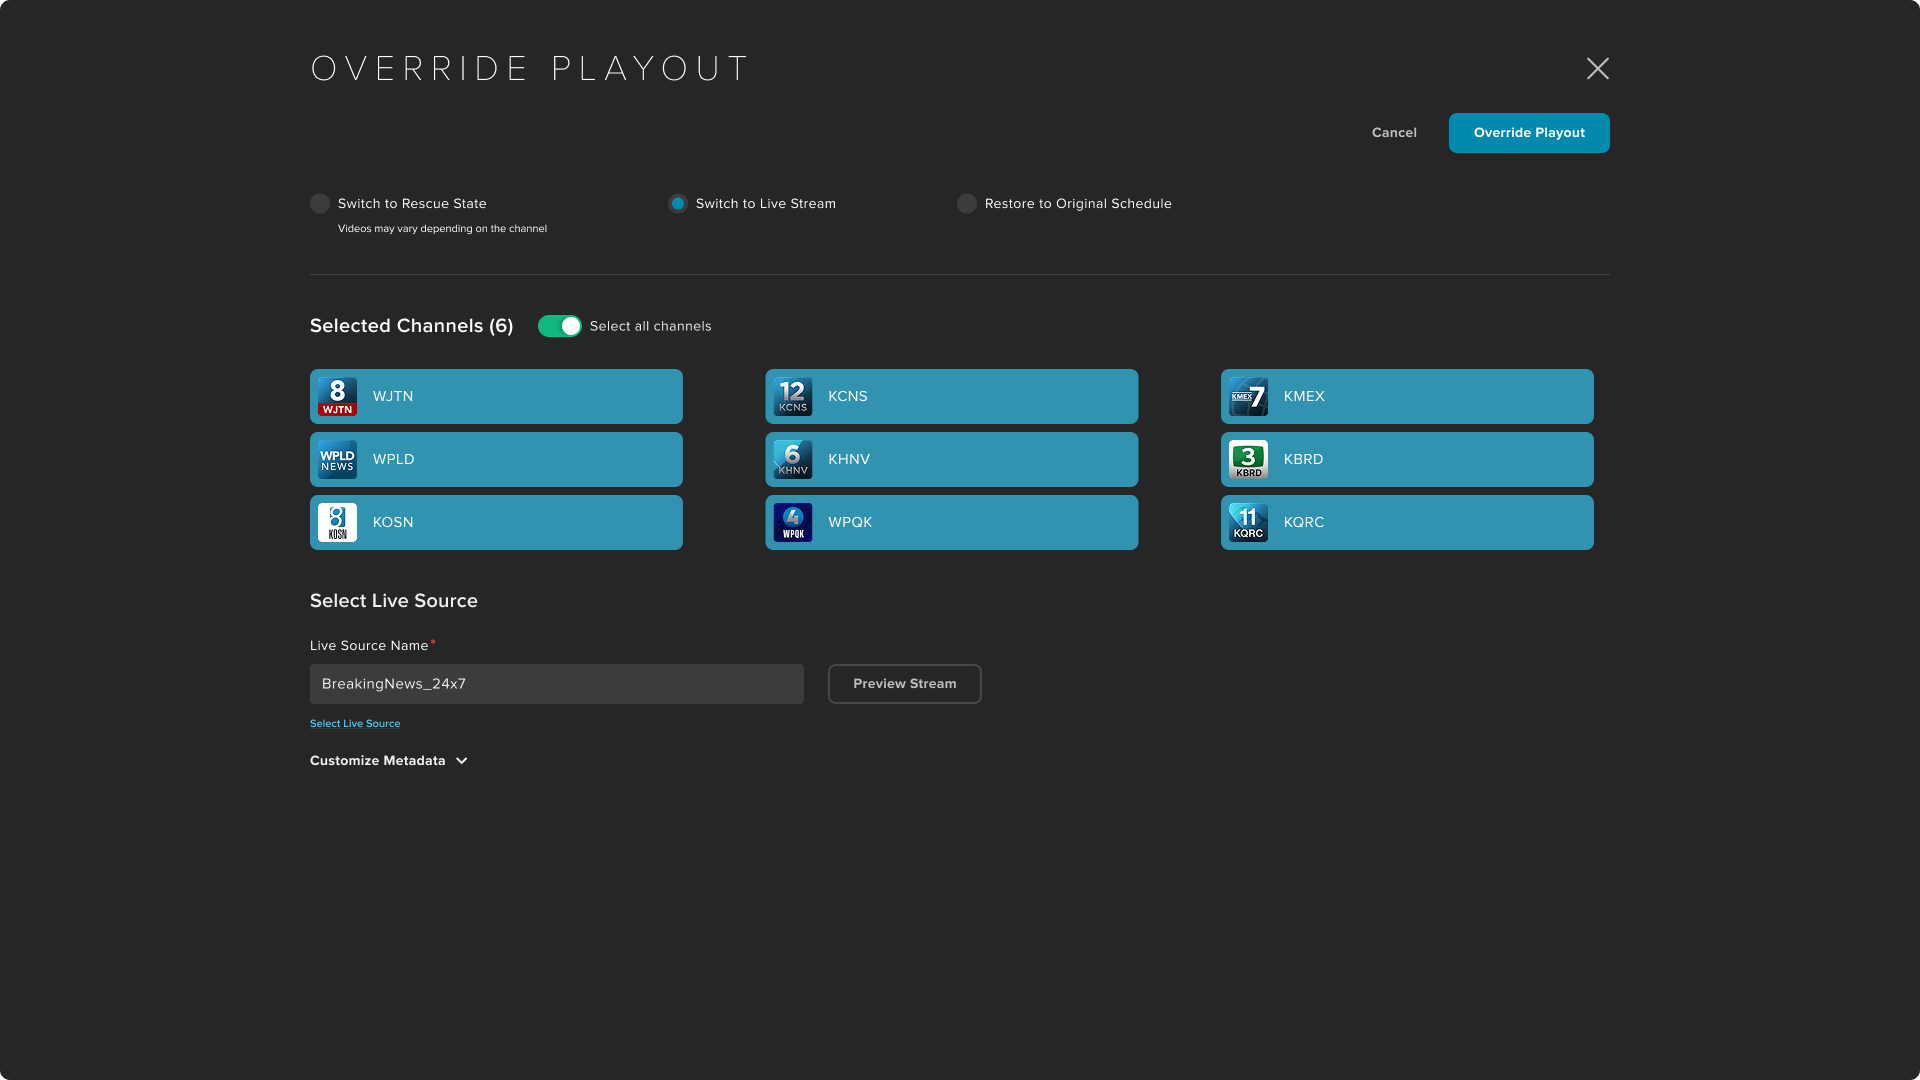
Live Override
Live Sources can also be used as a live override from the Monitor panel in Connect. Highlight a channel and select the third button to enter the override playout menu. From here select between Switch to Rescue Slate, Switch to Live Stream, or Restore to Original Schedule if a channel is overridden.
Manual Ad Insertion
In Manual Live or Automatic Switches, a user can trigger SCTE-35 markers to be sent to a stream manually. To do so, open the running event in the schedule, go to the Manual tab, and there will be a dropdown on the bottom left of your Live Source to open options for inserting Ad Markers. Select a duration and "Insert Ad Break" at the desired time. This will then play the ad slate configured with that source.
SCTE-35 Examples
These are the types of Markers Frequency will send in its linear playout:
Splice
splice_info_section() { table_id 252(0xFC) section_syntax_indicator false private_indicator false section_length 35(0x23) protocol_version 0(0x0) encrypted_packet false encryption_algorithm 0(0x0) pts_adjustment 0(0x0) cw_index 0(0x0) tier 4095(0xFFF) splice_command_length 1(0x1) splice_command_type 6(0x6) time_signal time_signal() { splice_time() { time_specified_flag false } } descriptor_loop_length 17(0x11) segmentation_descriptor() { splice_descriptor_tag 2(0x2) descriptor_length 15(0xF) identifier 1129661769(0x43554549)(ASCII-CUEI) segmentation_event_id 1092(0x444) segmentation_event_cancel_indicator false program_segmentation_flag true segmentation_duration_flag false delivery_not_restricted_flag false web_delivery_allowed_flag false no_regional_blackout_flag false archive_allowed_flag true device_restrictions 3(0x3)(None) segmentation_upid_type 9(0x9) (ADI) segmentation_upid_length 0(0x0) segmentation_upid() NA segmentation_type_id 80(0x50)(Network Start) segment_num 0(0x0) segments_expected 1(0x1) } CRC_32 2591837253(0x9A7C4C45)}Start On Signal
splice_info_section() { table_id 252(0xFC) section_syntax_indicator false private_indicator false section_length 35(0x23) protocol_version 0(0x0) encrypted_packet false encryption_algorithm 0(0x0) pts_adjustment 0(0x0) cw_index 0(0x0) tier 4095(0xFFF) splice_command_length 1(0x1) splice_command_type 6(0x6) time_signal time_signal() { splice_time() { time_specified_flag false } } descriptor_loop_length 17(0x11) segmentation_descriptor() { splice_descriptor_tag 2(0x2) descriptor_length 15(0xF) identifier 1129661769(0x43554549)(ASCII-CUEI) segmentation_event_id 1092(0x444) segmentation_event_cancel_indicator false program_segmentation_flag true segmentation_duration_flag false delivery_not_restricted_flag false web_delivery_allowed_flag false no_regional_blackout_flag false archive_allowed_flag true device_restrictions 3(0x3)(None) segmentation_upid_type 9(0x9) (ADI) segmentation_upid_length 0(0x0) segmentation_upid() NA segmentation_type_id 81(0x51)(Network End) segment_num 0(0x0) segments_expected 1(0x1) } CRC_32 2611273922(0x9BA4E0C2)}Graphics Integration
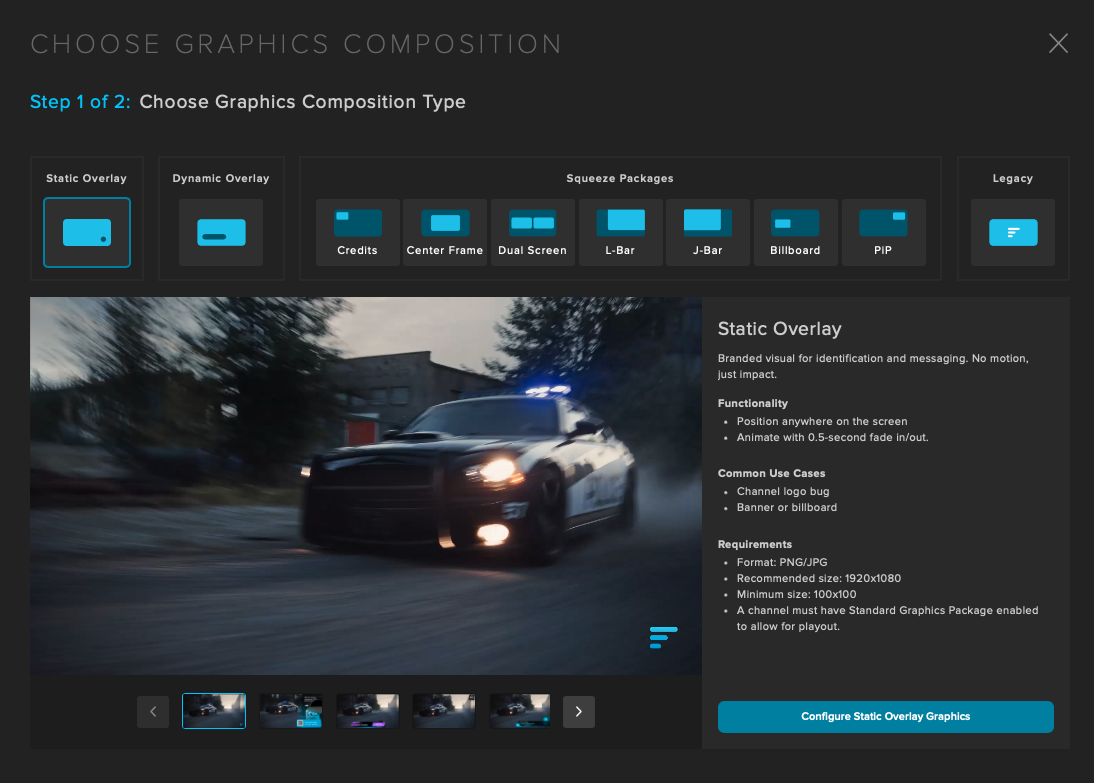
Add Graphics+ overlays during live events for branding, sponsorships, or engagement.
Schedule graphics in advance and monitor through Playout Rundown.
Choose the desired Graphics Composition Type:
Frequency Supports a variety of composition types, including static, dynamic and squeezebacks.
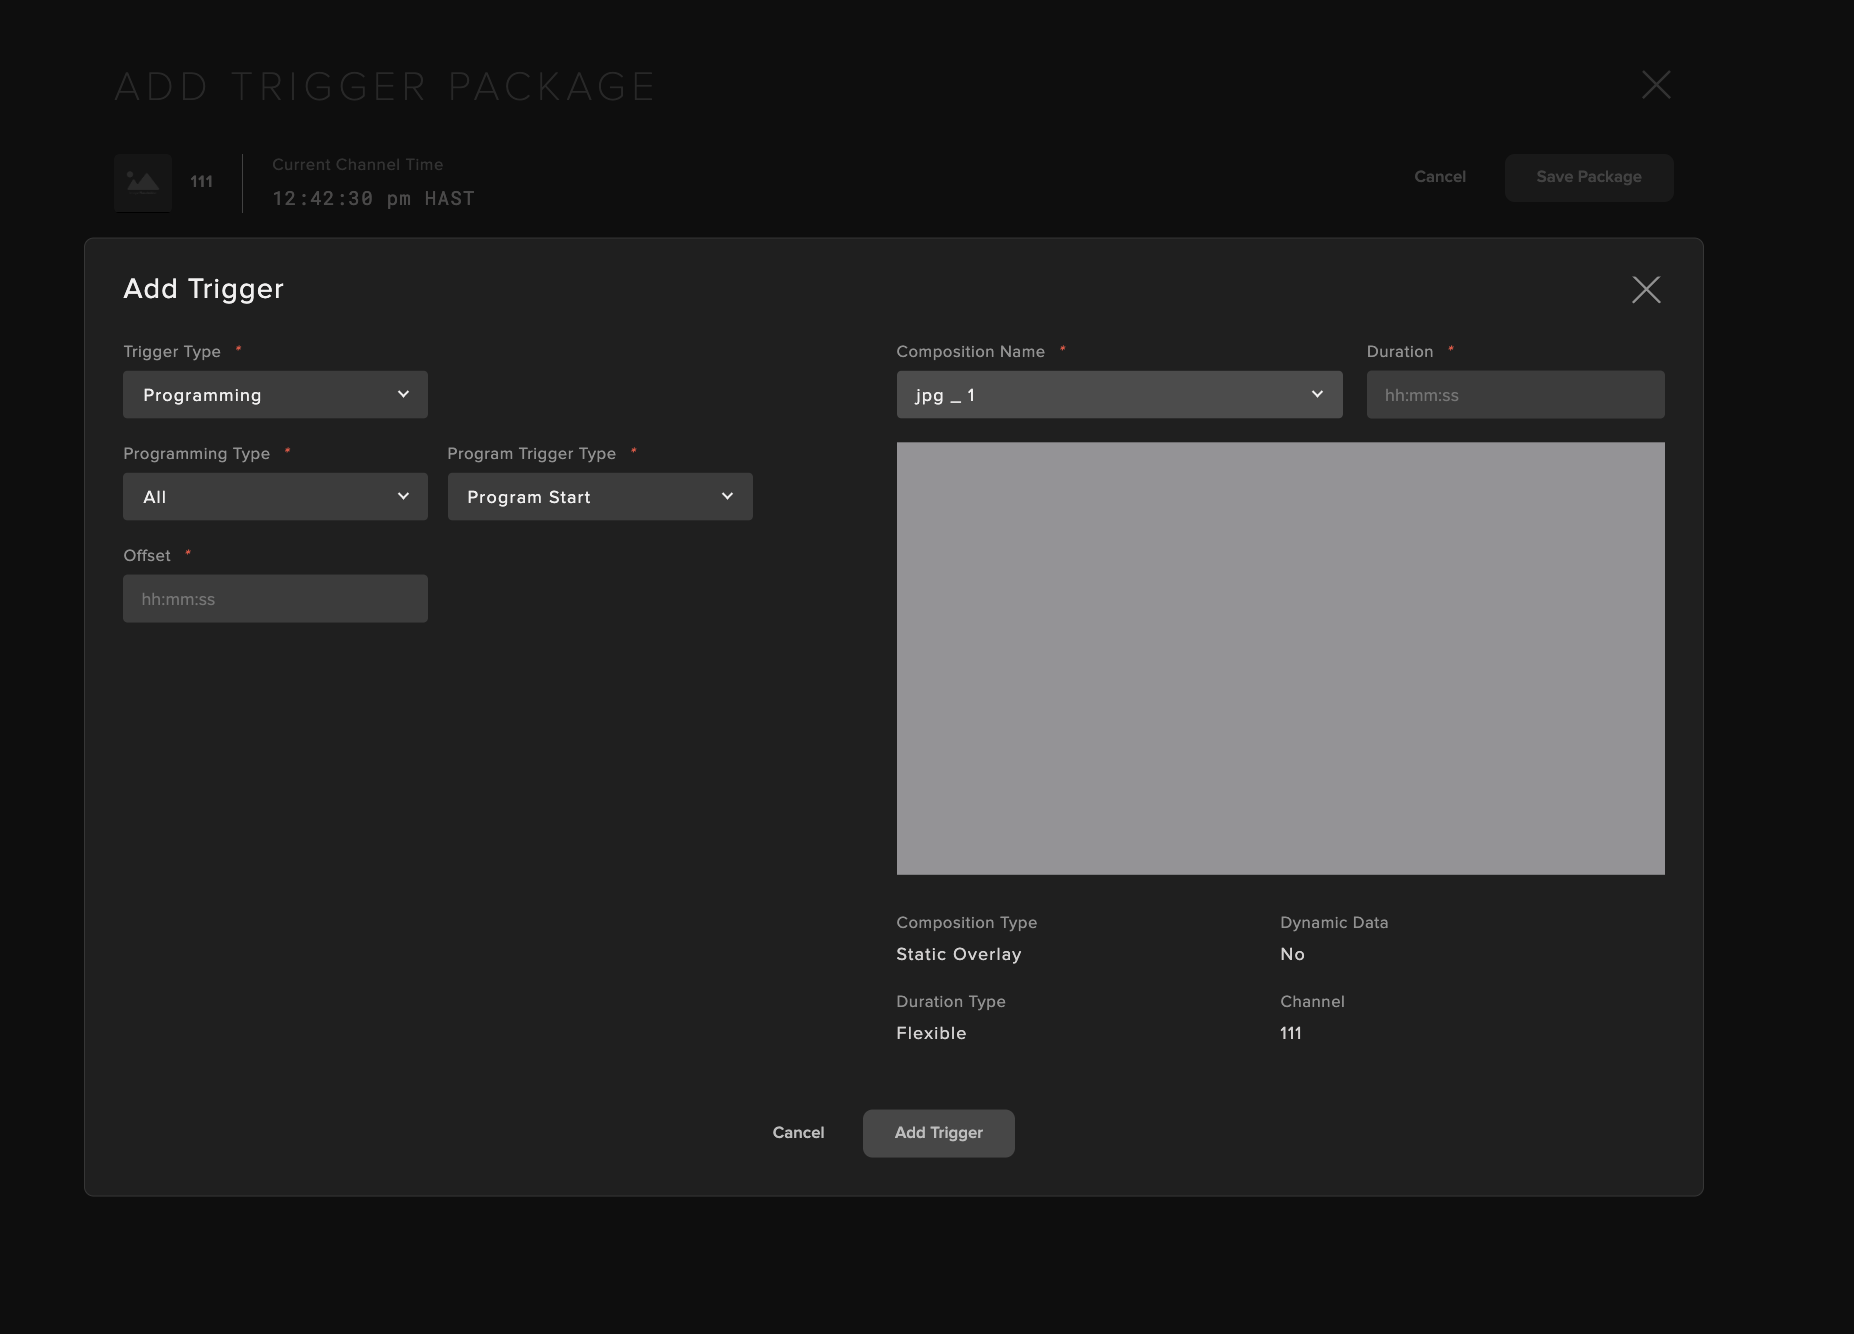
Add your triggers to the package:
Deliver and Distribute
From a single live source, you can output to multiple channels or event streams.
Delivery Models:
Fully Live - 100% real-time broadcast with minimal lag.
Live Inserts - Blend live segments into a linear schedule.
Pop-Up Events - One-off programming for special events.
Enhancements:
Using Dynamic Graphics, metadata-driven overlays allow for automated branding.
Implement cue-aware transitions for smoother viewing.
Validate and Protect Live Events
Before and during live playout, validate your setup and use built-in safeguards for uninterrupted playout.
Validation:
Use the real-time preview player to confirm feeds, graphics, and transitions.
Monitor system health dashboards for source and output stability.
Redundancy:
Multi-region failover and dual-region redundancy.
Isolated DR stack for rapid disaster recovery.
Monitoring:
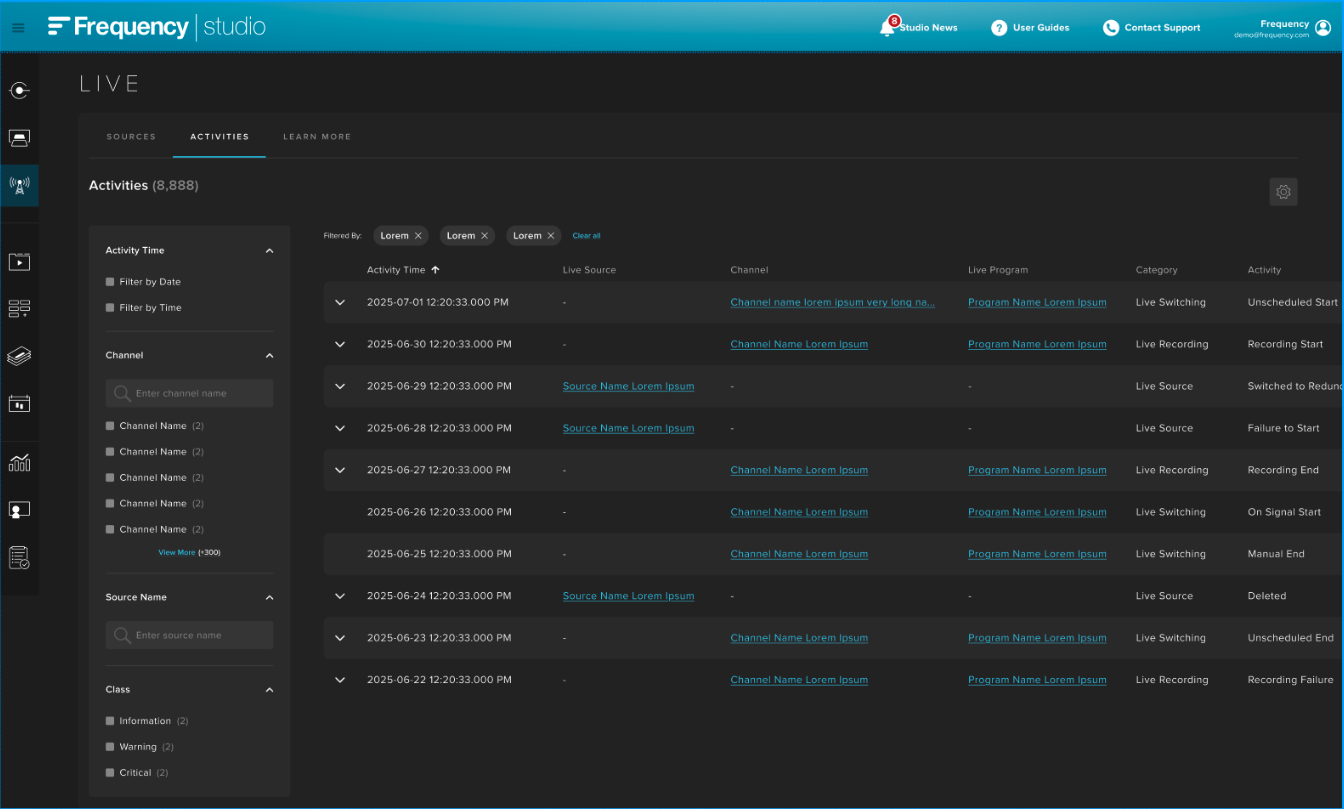
The Activities tab in the LIVE tool allows for real-time health insights and audit trails.
Automated alerts for ingest, switching, and DR events.