MANAGE User Guide
Overview
MANAGE enables users to manage their content. Users can manage videos that are being processed as well as those ready for distribution. This tool offers a quick way to find the content in the system for the account and make metadata edits.
Features
Browsing Existing Videos
Grid View vs. List View
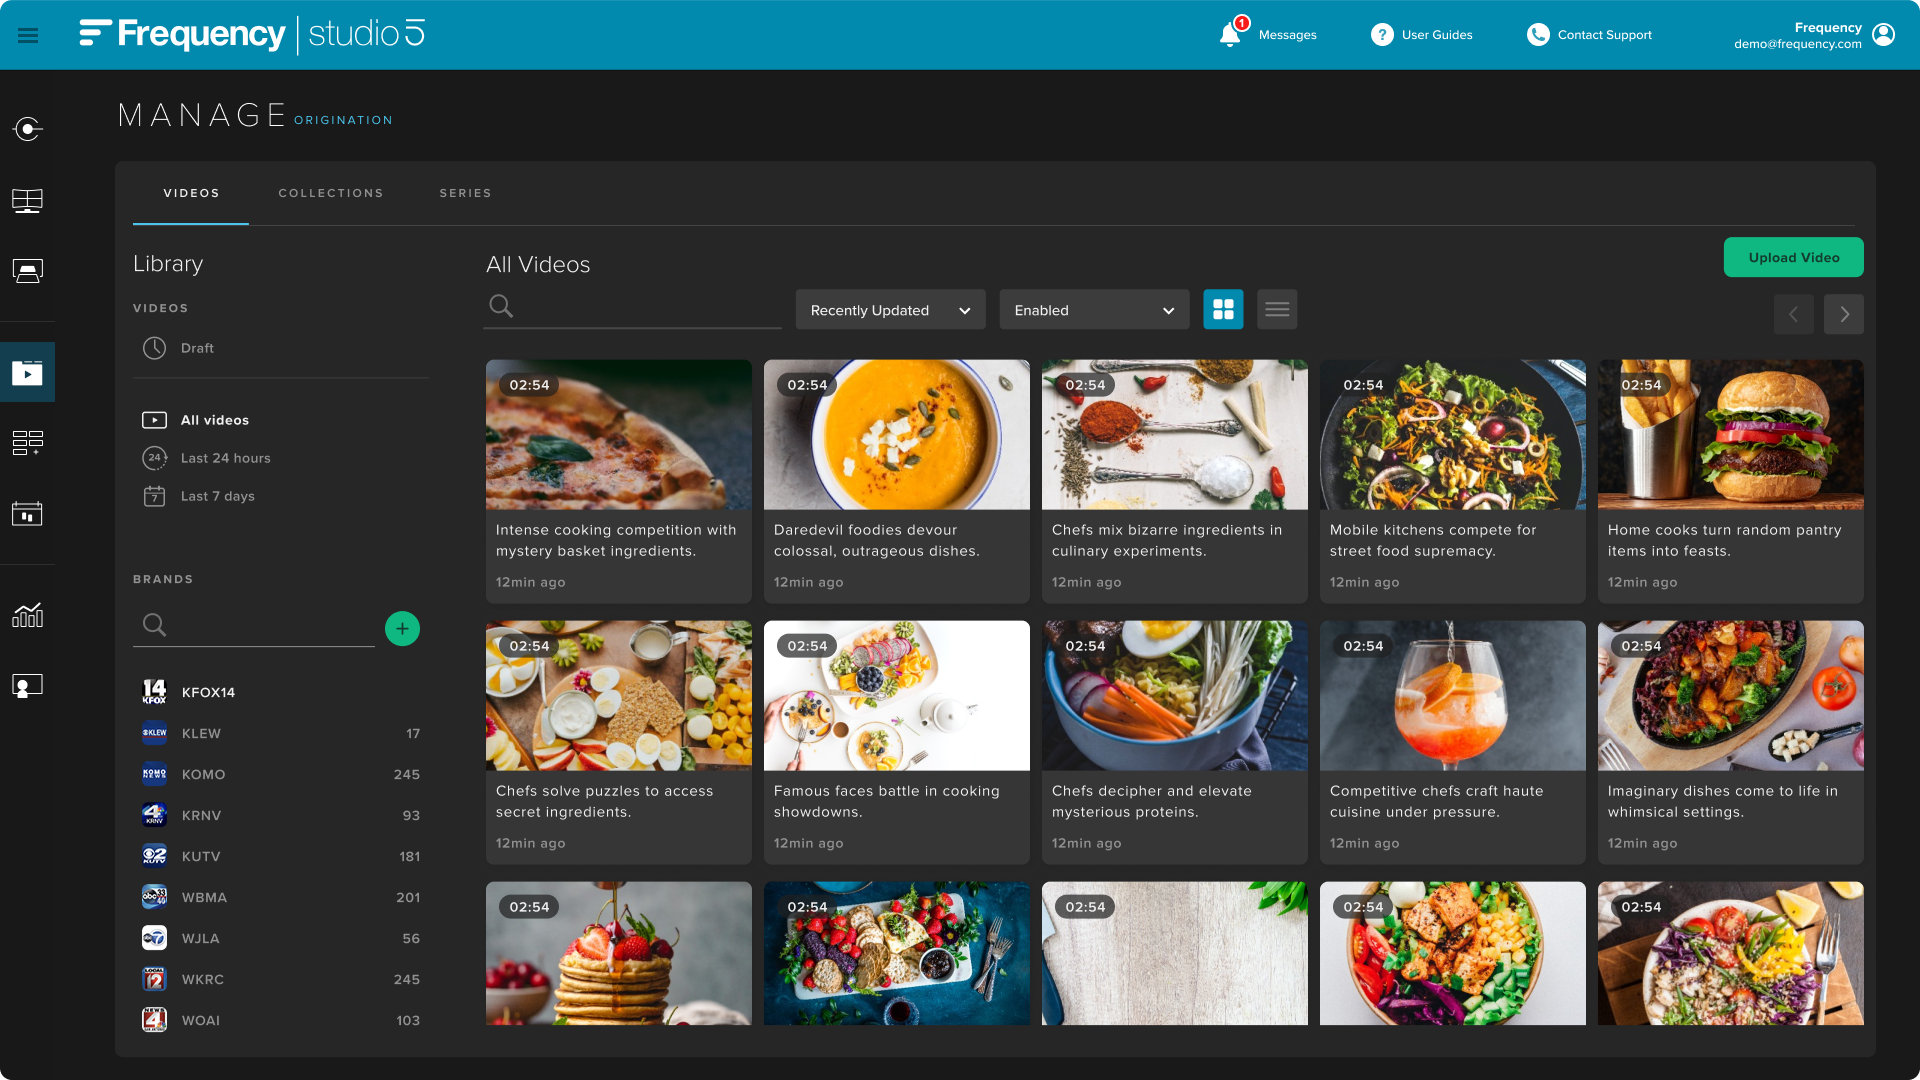
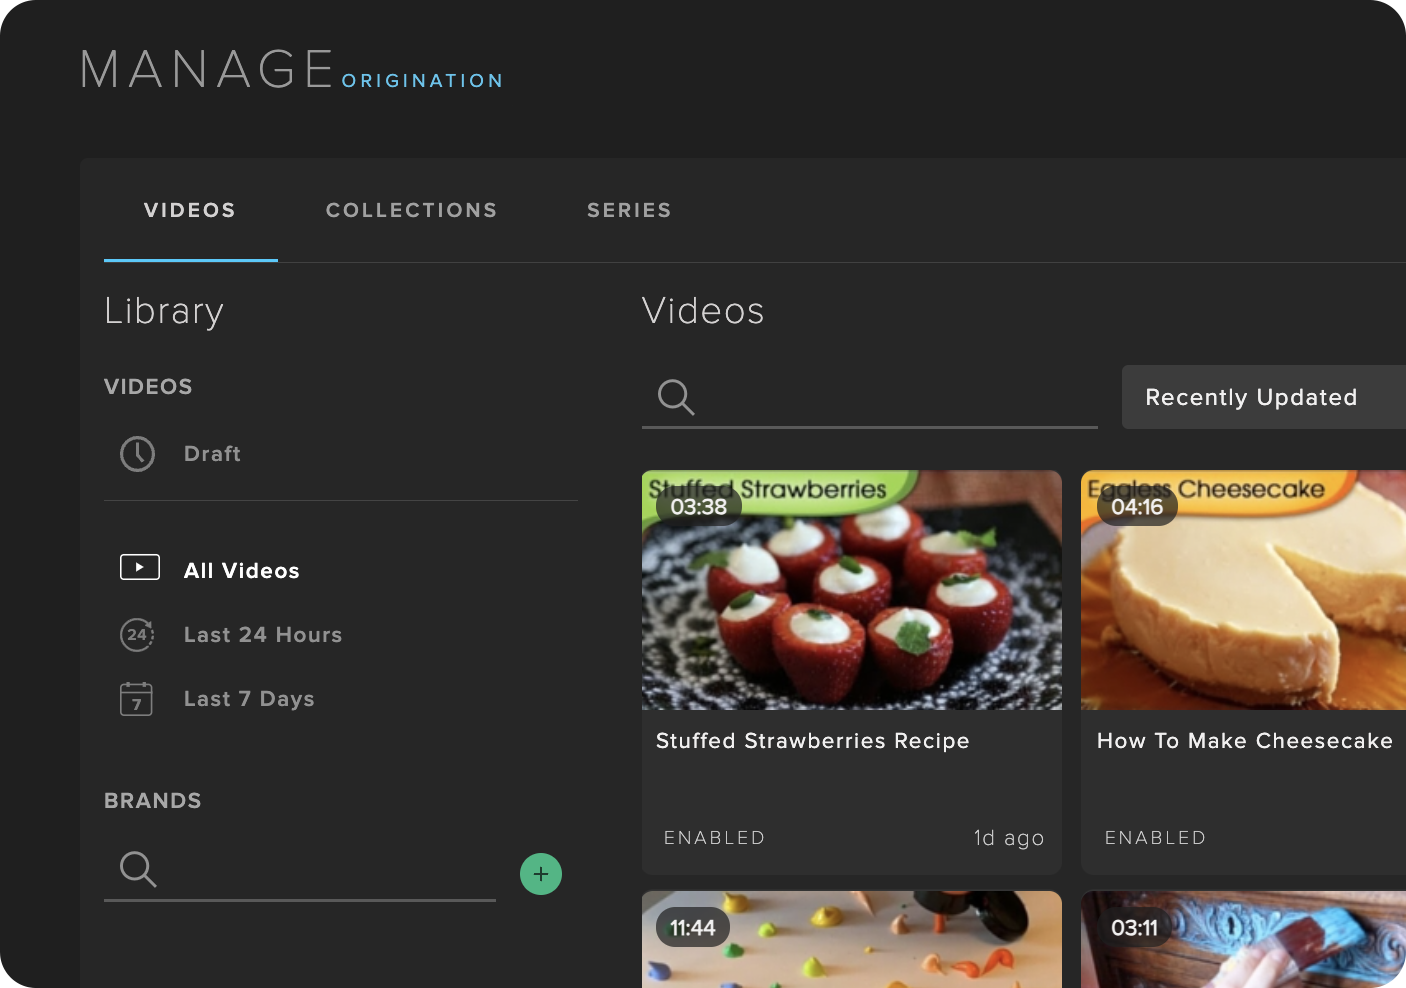
Two views are available for browsing videos: Grid View and List View.
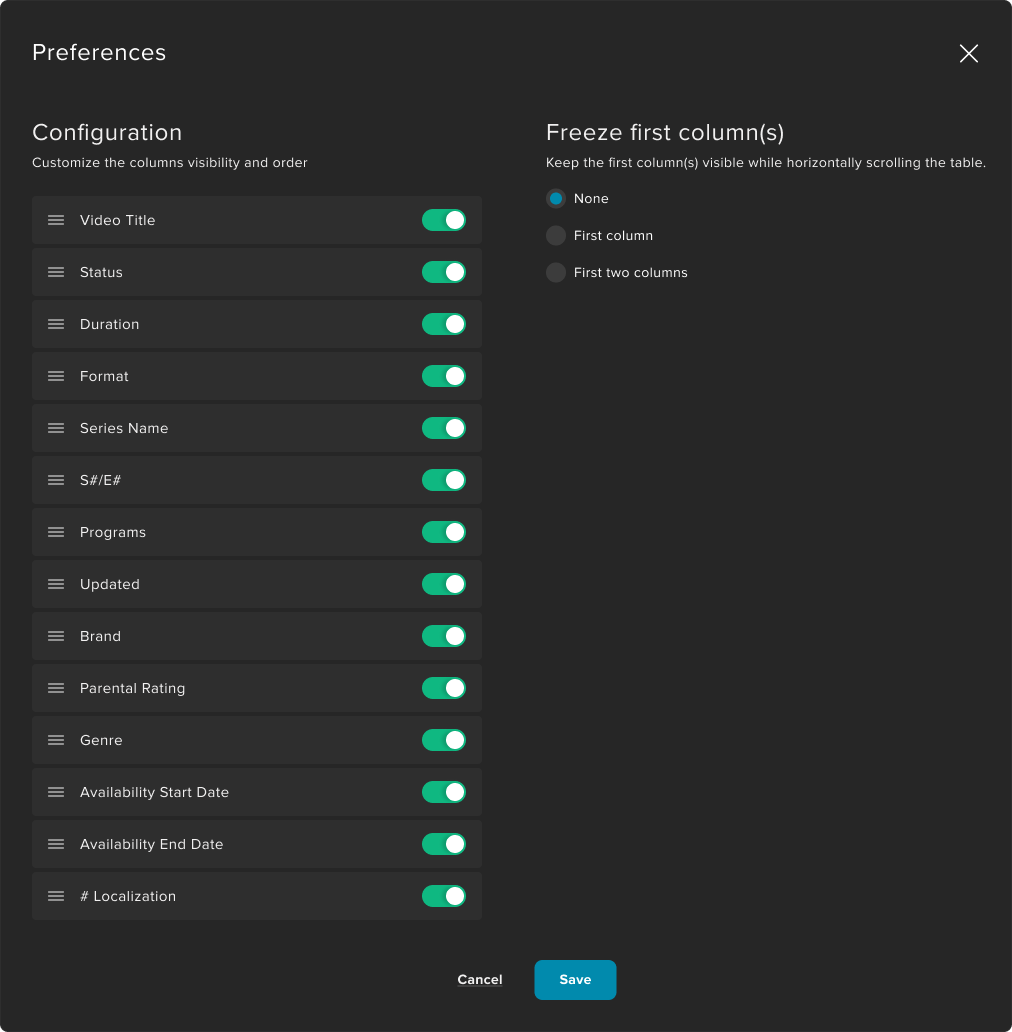
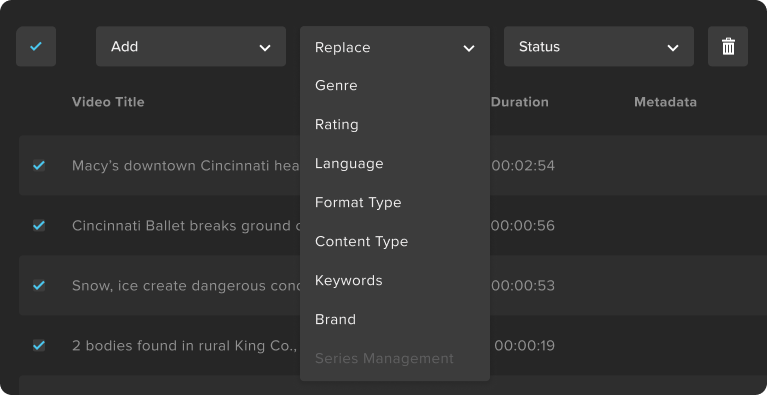
In the top right of the list view the gear can be clicked which allows for the addition or removal of a variety of metadata viewable on this page.
Sorting & Statuses
By default, the most recent videos are shown. The user can narrow down the videos by using a keyword search, filter by, and sort by. Furthermore, the user can use shortcuts on the left side to filter by All Videos, Last 24 Hours, Last 7 Days, or belonging to one of the Brands within the account.
Types | Sub-types |
|---|---|
Sort by |
|
Filter by |
|

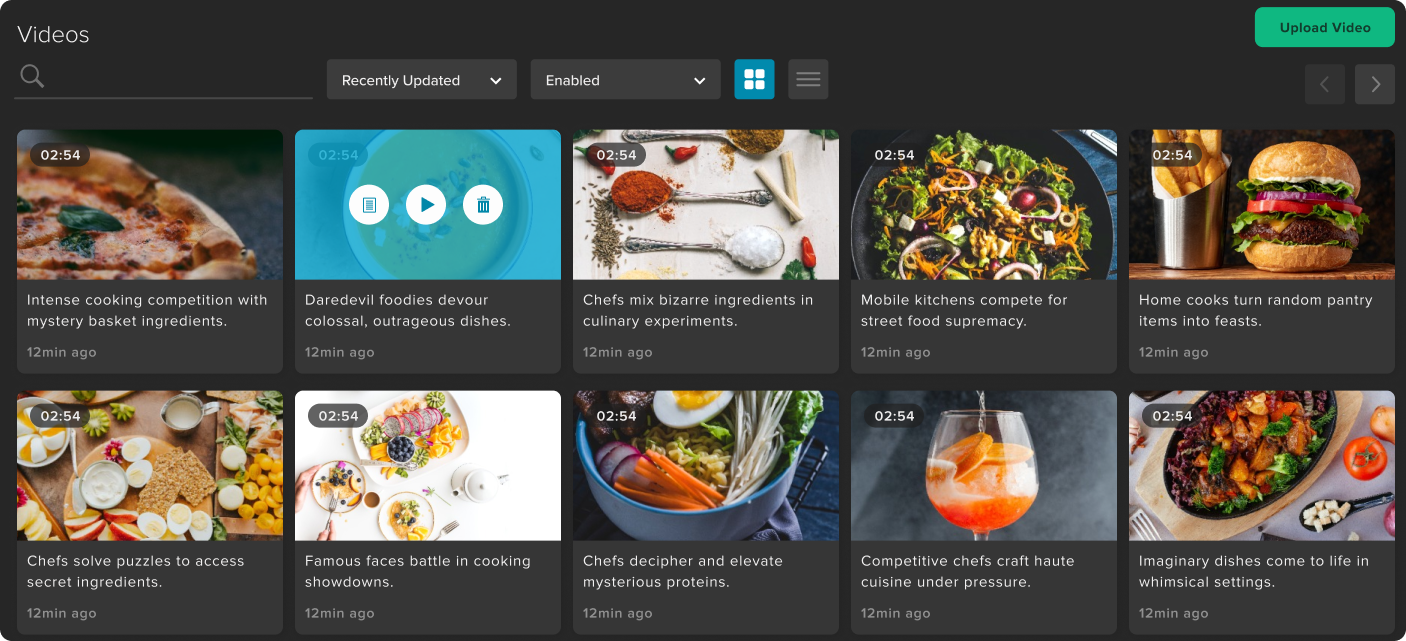
Using the Grid View
The Grid View focuses on exposing video thumbnails. The user sees the video thumbnail, duration, title, status, and relative date for when the video was uploaded. The user, when hovering over the video, can preview the video or its metadata.
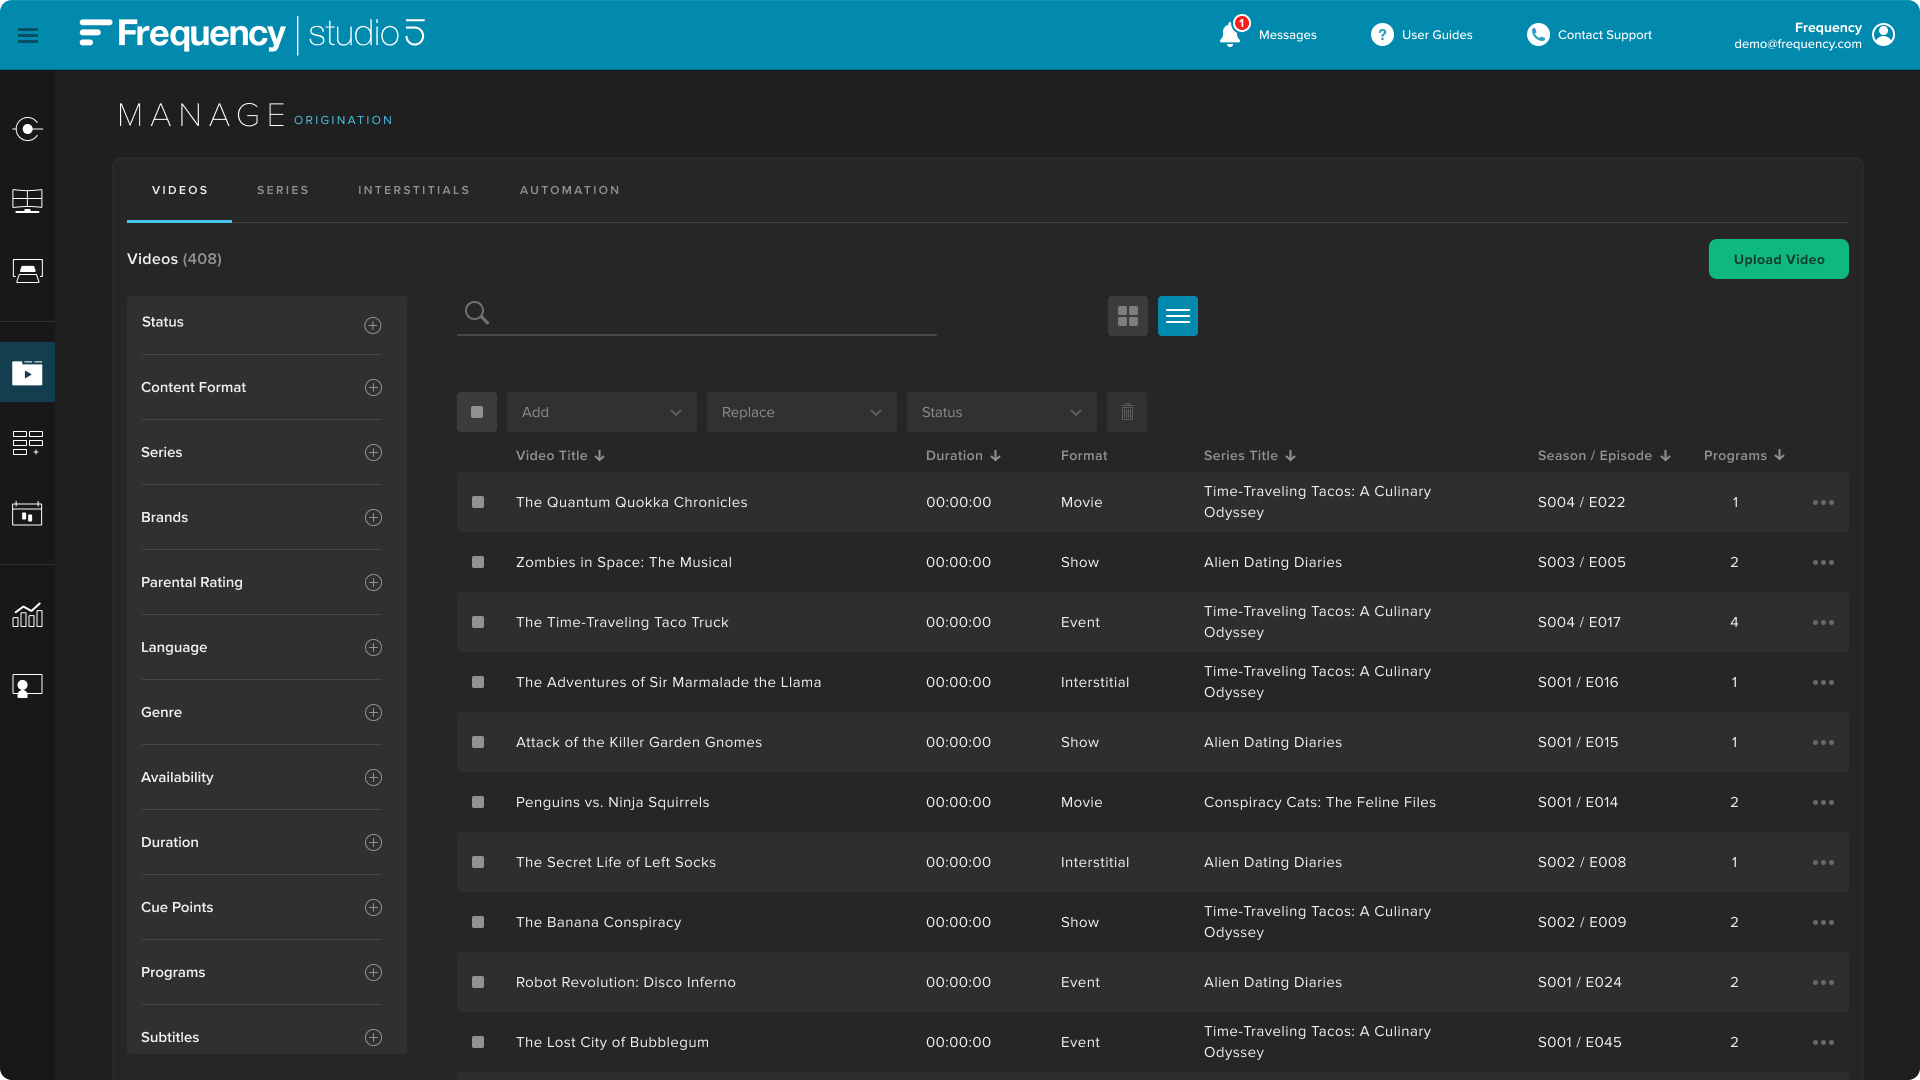
Bulk Update Metadata in List View
List view is optimized for high volume content management. The user sees the video title, duration, published date, date created, status, and brand. The user can select one or more, or all (limited to 30 at a time) of the videos within the page, to perform bulk operations. The following operations are possible:
Bulk Action | Target Change | Notes |
|---|---|---|
Item Selector Checkbox | -- | Select one or more, up to 100 at once for bulk operation. |
Add Field Values |
| Append metadata to existing field values. |
Replace Field Values |
| Replaces metadata to existing field values. |
Status Change |
| Change status for selected videos. A status of Enabled means that the video is available for distribution and end-user consumption. |
Delete | Entire Video Record | Permanently deletes the selected videos from the system and all its assets. This action is irreversible. |
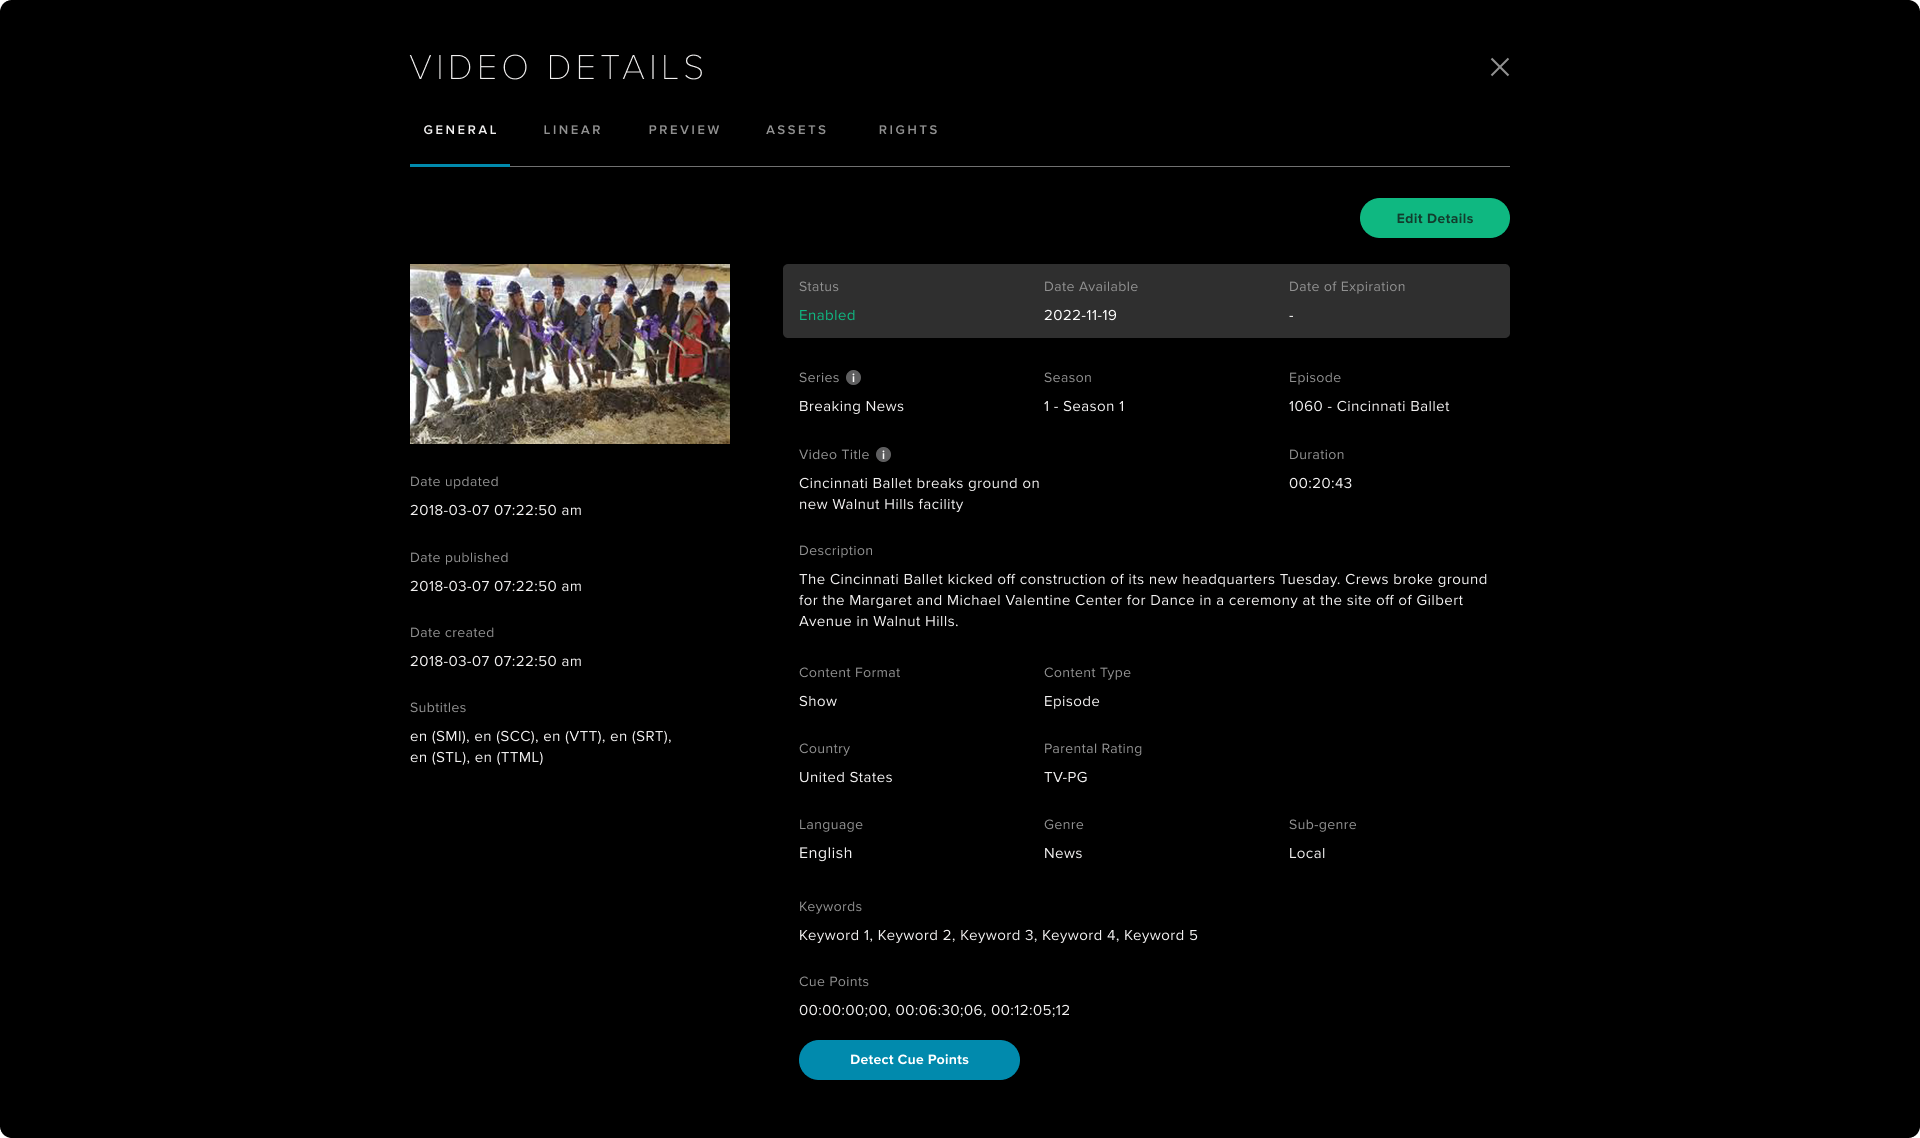
Video Details
Video details show all pertinent video metadata for the user to review. The user reviews video metadata in order to ensure completeness and accuracy. Video metadata is used for distribution display to the video consumer in distribution outlets and for supporting recommendations and insights for backend services.
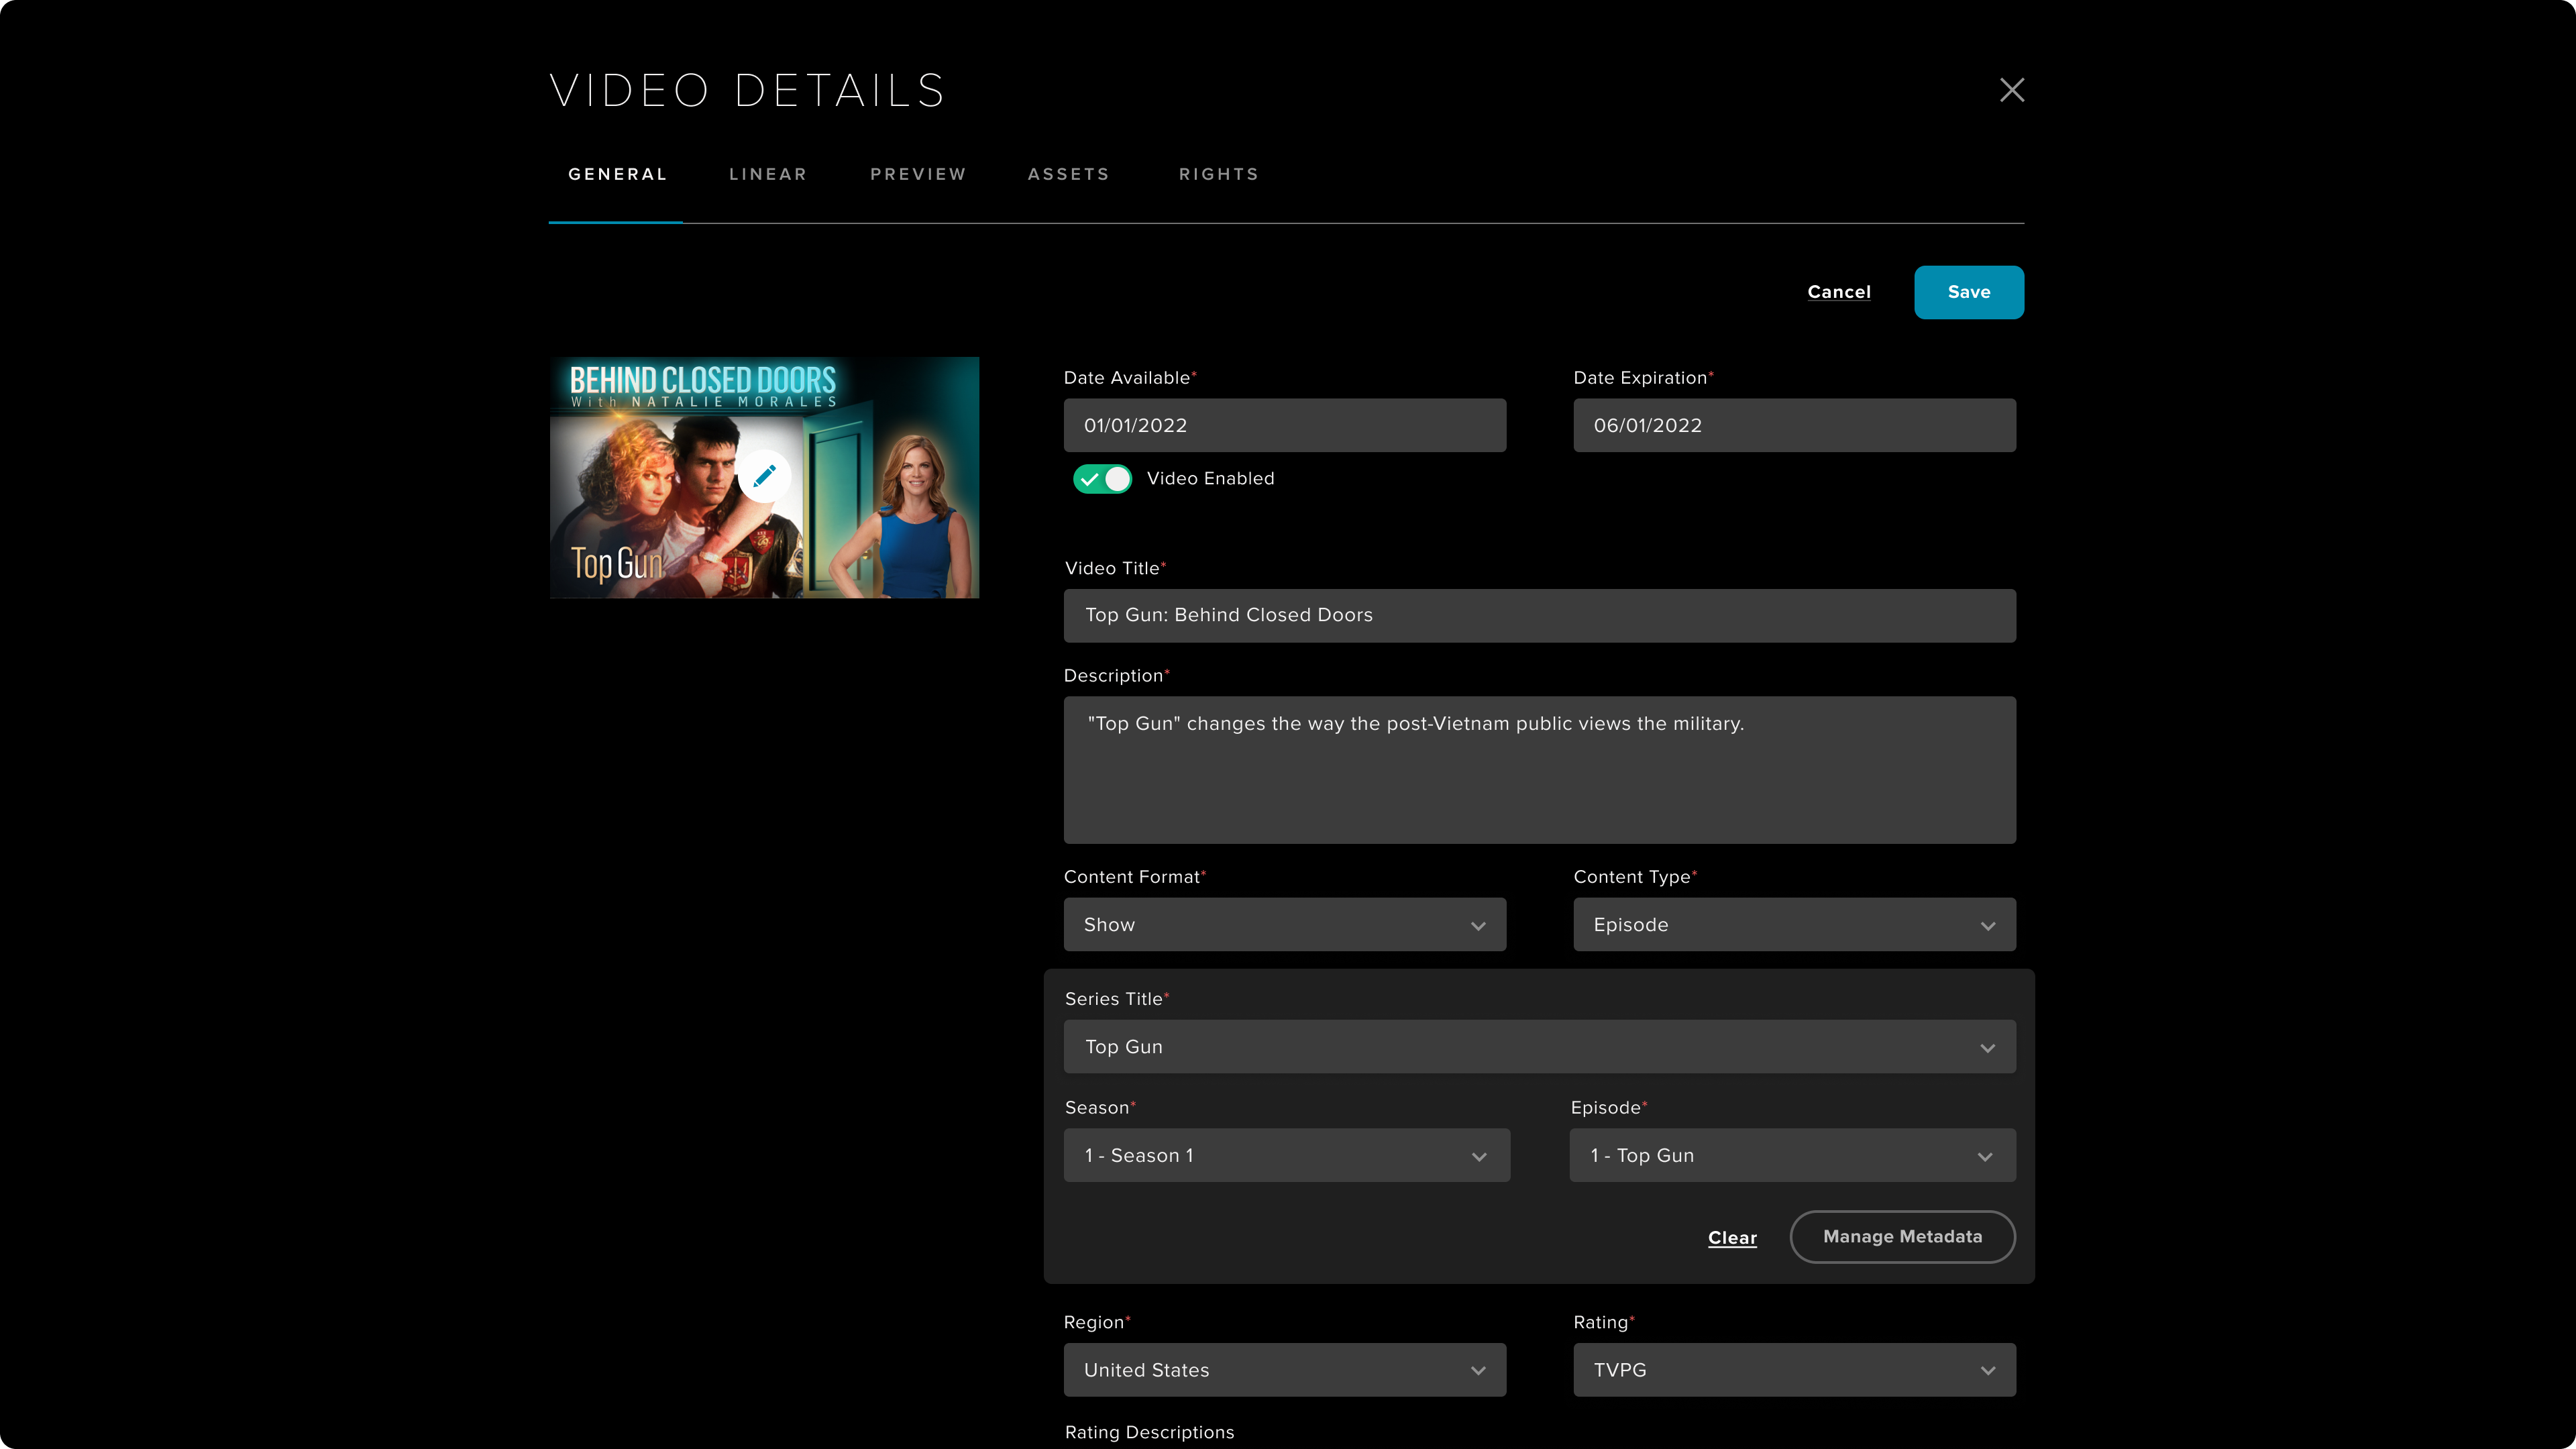
The user can also make edits to the video metadata, including changing the video thumbnail, by clicking on the Edit Details button. Multiple image variants can be uploaded including 16x9, 2x3, 4x3, 3x4, 5x9, 1x1, and 4x1 aspect ratios. Furthermore, users can now describe whether these images contain text or not.

General Metadata
For each video, regardless of View selected, the user can view the Video Details page by click on the View Details selection (Grid View: Hover over and click on icon, List View: Click on video result row).
Video Thumbnail - This is the artwork for the video.
Video Title - The title of the video. This cannot be blank.
Video ID - Automatically generated unique identifier for the video.
Status - Status for the video.
Description - Description for the video. This cannot be blank.
Country - The primary country of production for this video. This drives the possible values for Rating.
Rating - The rating value for this video.
Language - The primary audio language for this video.
Genre / Sub-genre - The Frequency genre and sub-genre classification for this video. At least one is required. More than one genre is supported. Sub-genres are optional.
Content Format - The production format of the video (e.g.: Show).
Content Type - The content type of the video (e.g.: Review).
Keywords - Keywords that give contextual value for the video (people, places, topics, etc.).
Rating Descriptors - This metadata represents additional details to the Parental Ratings (e.g.: Violence, Adult Language, etc.). The new field supports comma-separated text (up to 100 characters) and is available for downstream processes (e.g.: Graphics, EPG).
Cuepoints - The timecode(s) where cuepoints exist. Cuepoints are primarily used to signal ad breaks. By default, the cuepoint is 0 for pre-roll only videos. Cuepoints are in units of seconds and support millisecond accuracy (601225 means ads can be inserted during playback at 10 minutes, 1 second, and 225 milliseconds). Multiple cuepoints are allowed separated by commas (e.g.: 601225,904220,1210122).
Date Available / Date of Expiration - Reference Data for internal use, to know when the the asset can be used.
Video Enabled - Toggles the video status to enabled or disabled. Disabled videos do not show up in Manage unless filtered to them.
Custom Metadata - Open field for any custom metadata that may be needed to pass through related to an asset.
Editing Video Details
To edit a video's metadata, click on the Edit Details button when viewing the video's details page. This would open a new modal with editable fields for the video's metadata. When done, click on Save.
Preview Video
The Preview section lets the user preview the videos for each transcoded rendition. The renditions can be changed using the dropdown on the top right, if there is more than one rendition for the video.

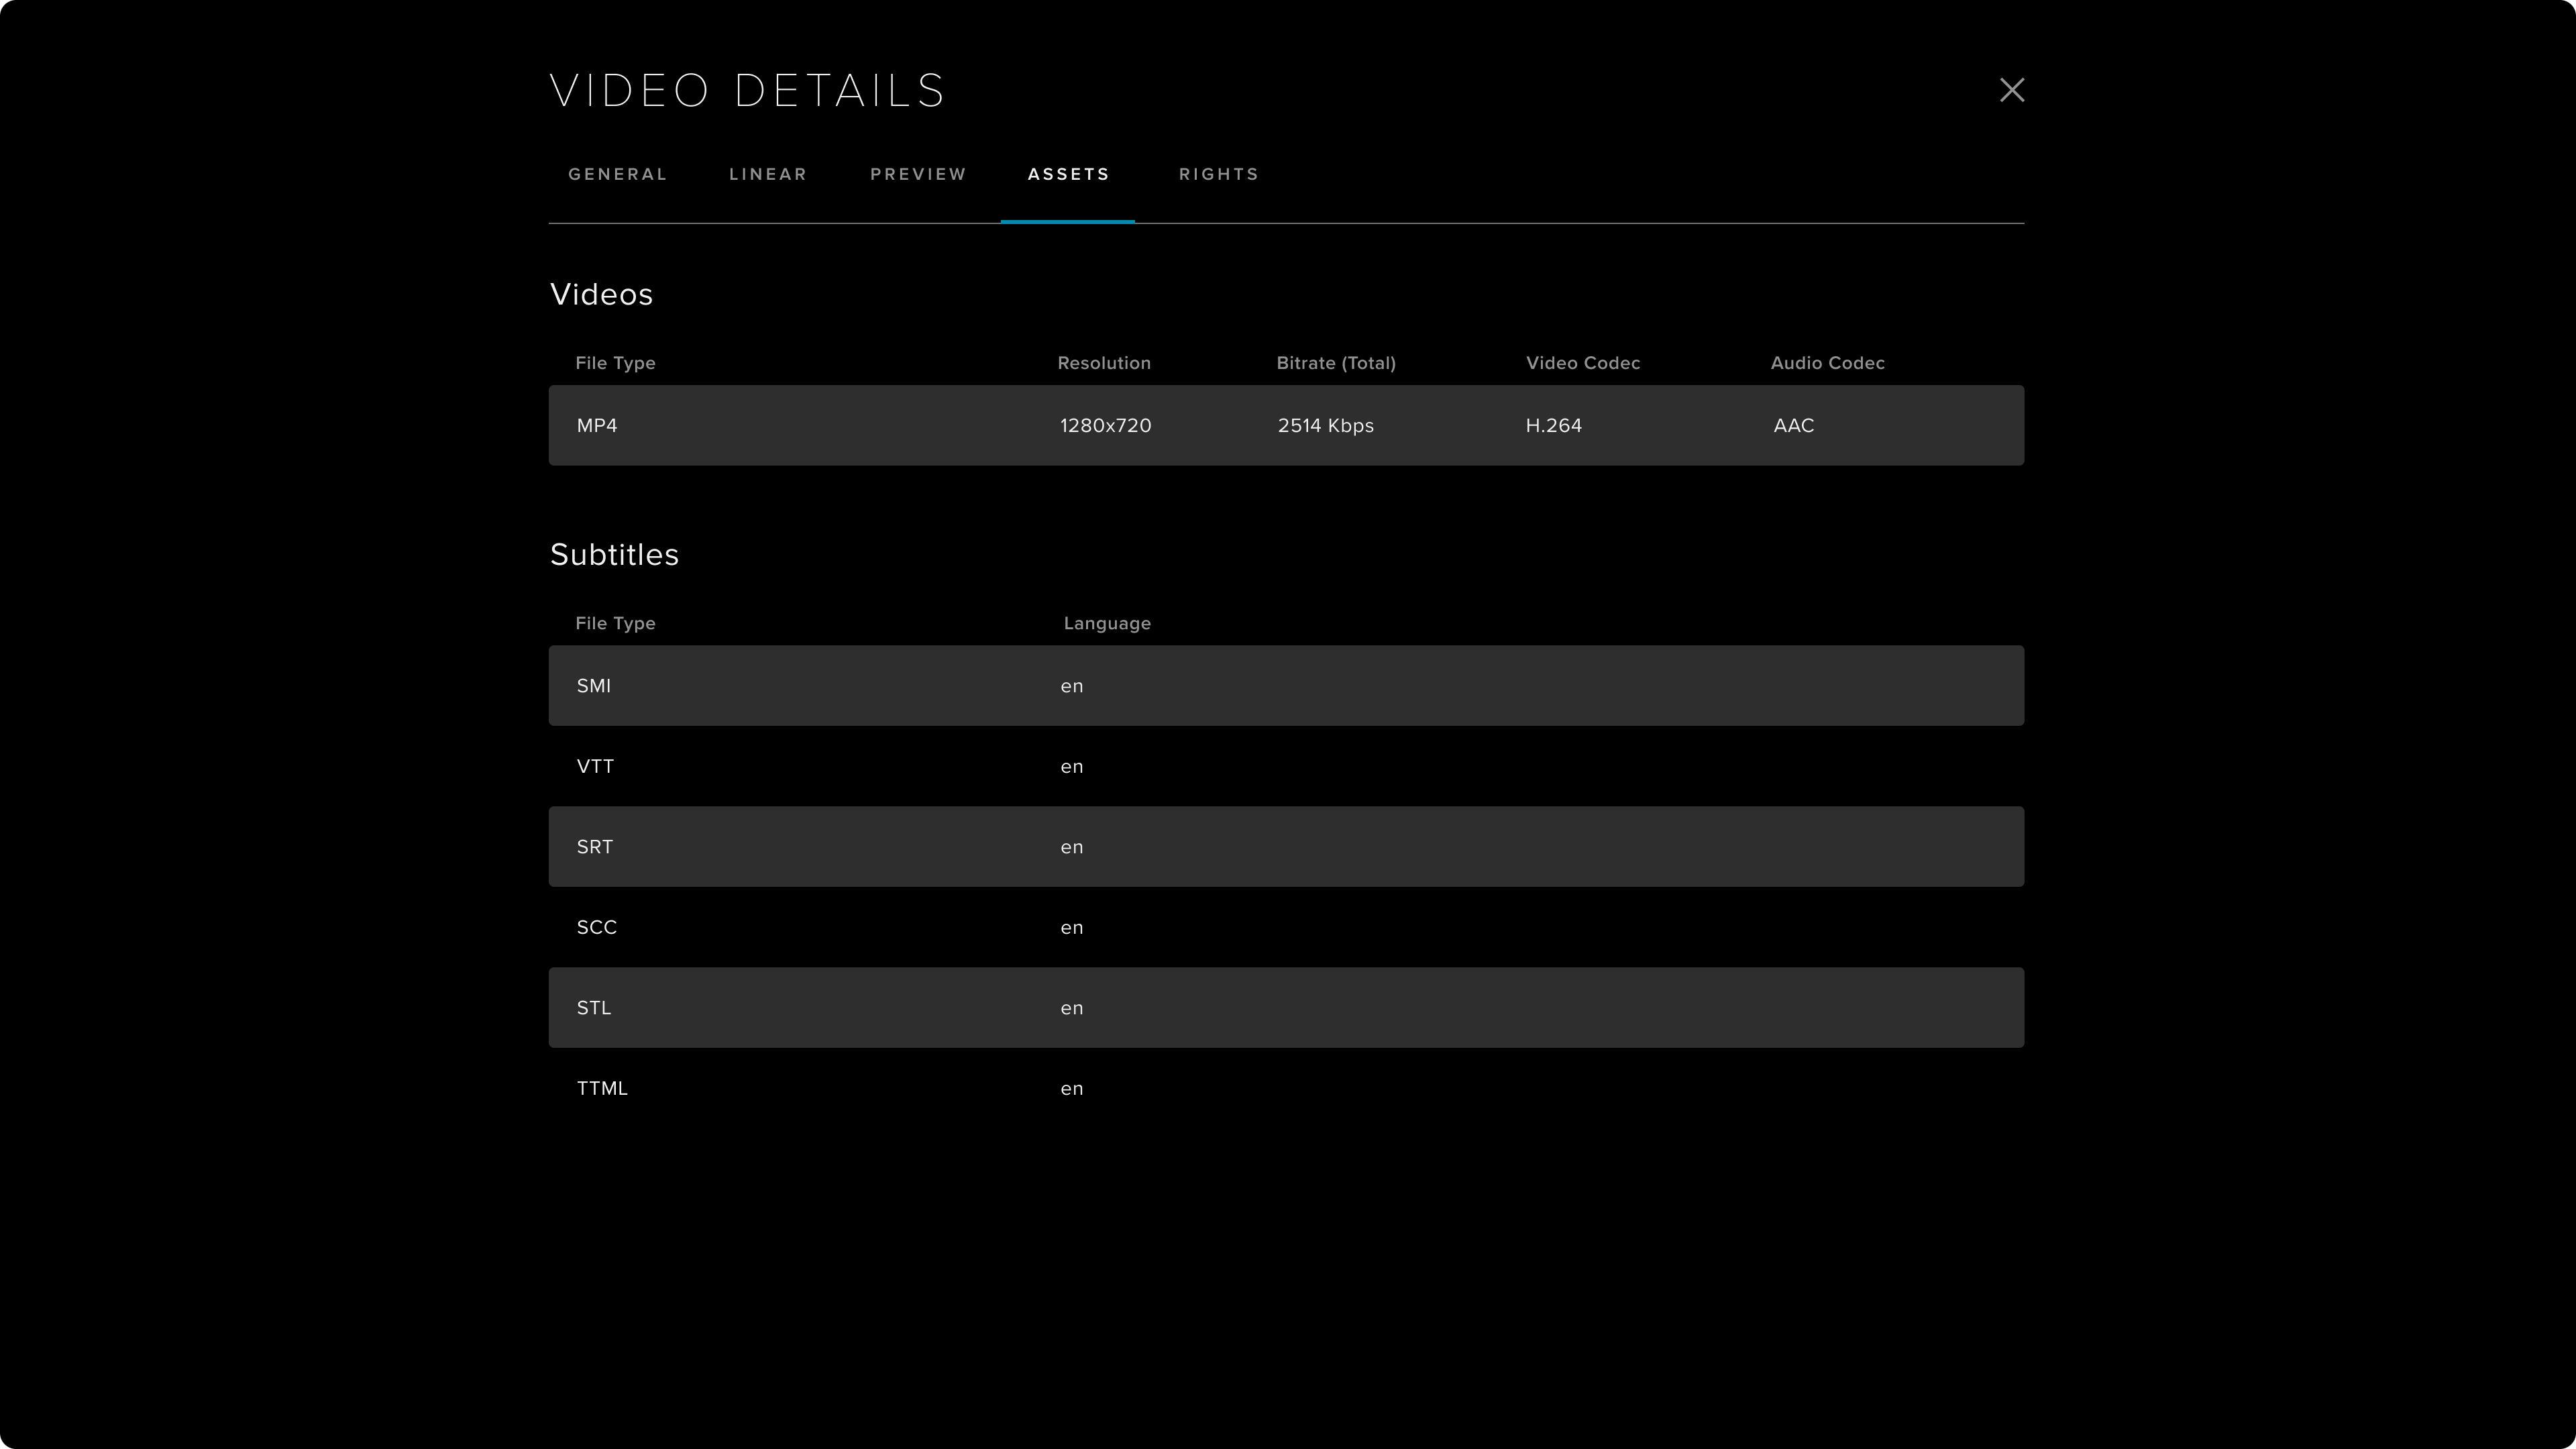
Video Assets
The Assets section lets the user review the different renditions transcoded for the video. Rendition specifications are shown for name, resolution, bitrate, video codec, and audio codec. For additional technical details, contact your Frequency Administrator.
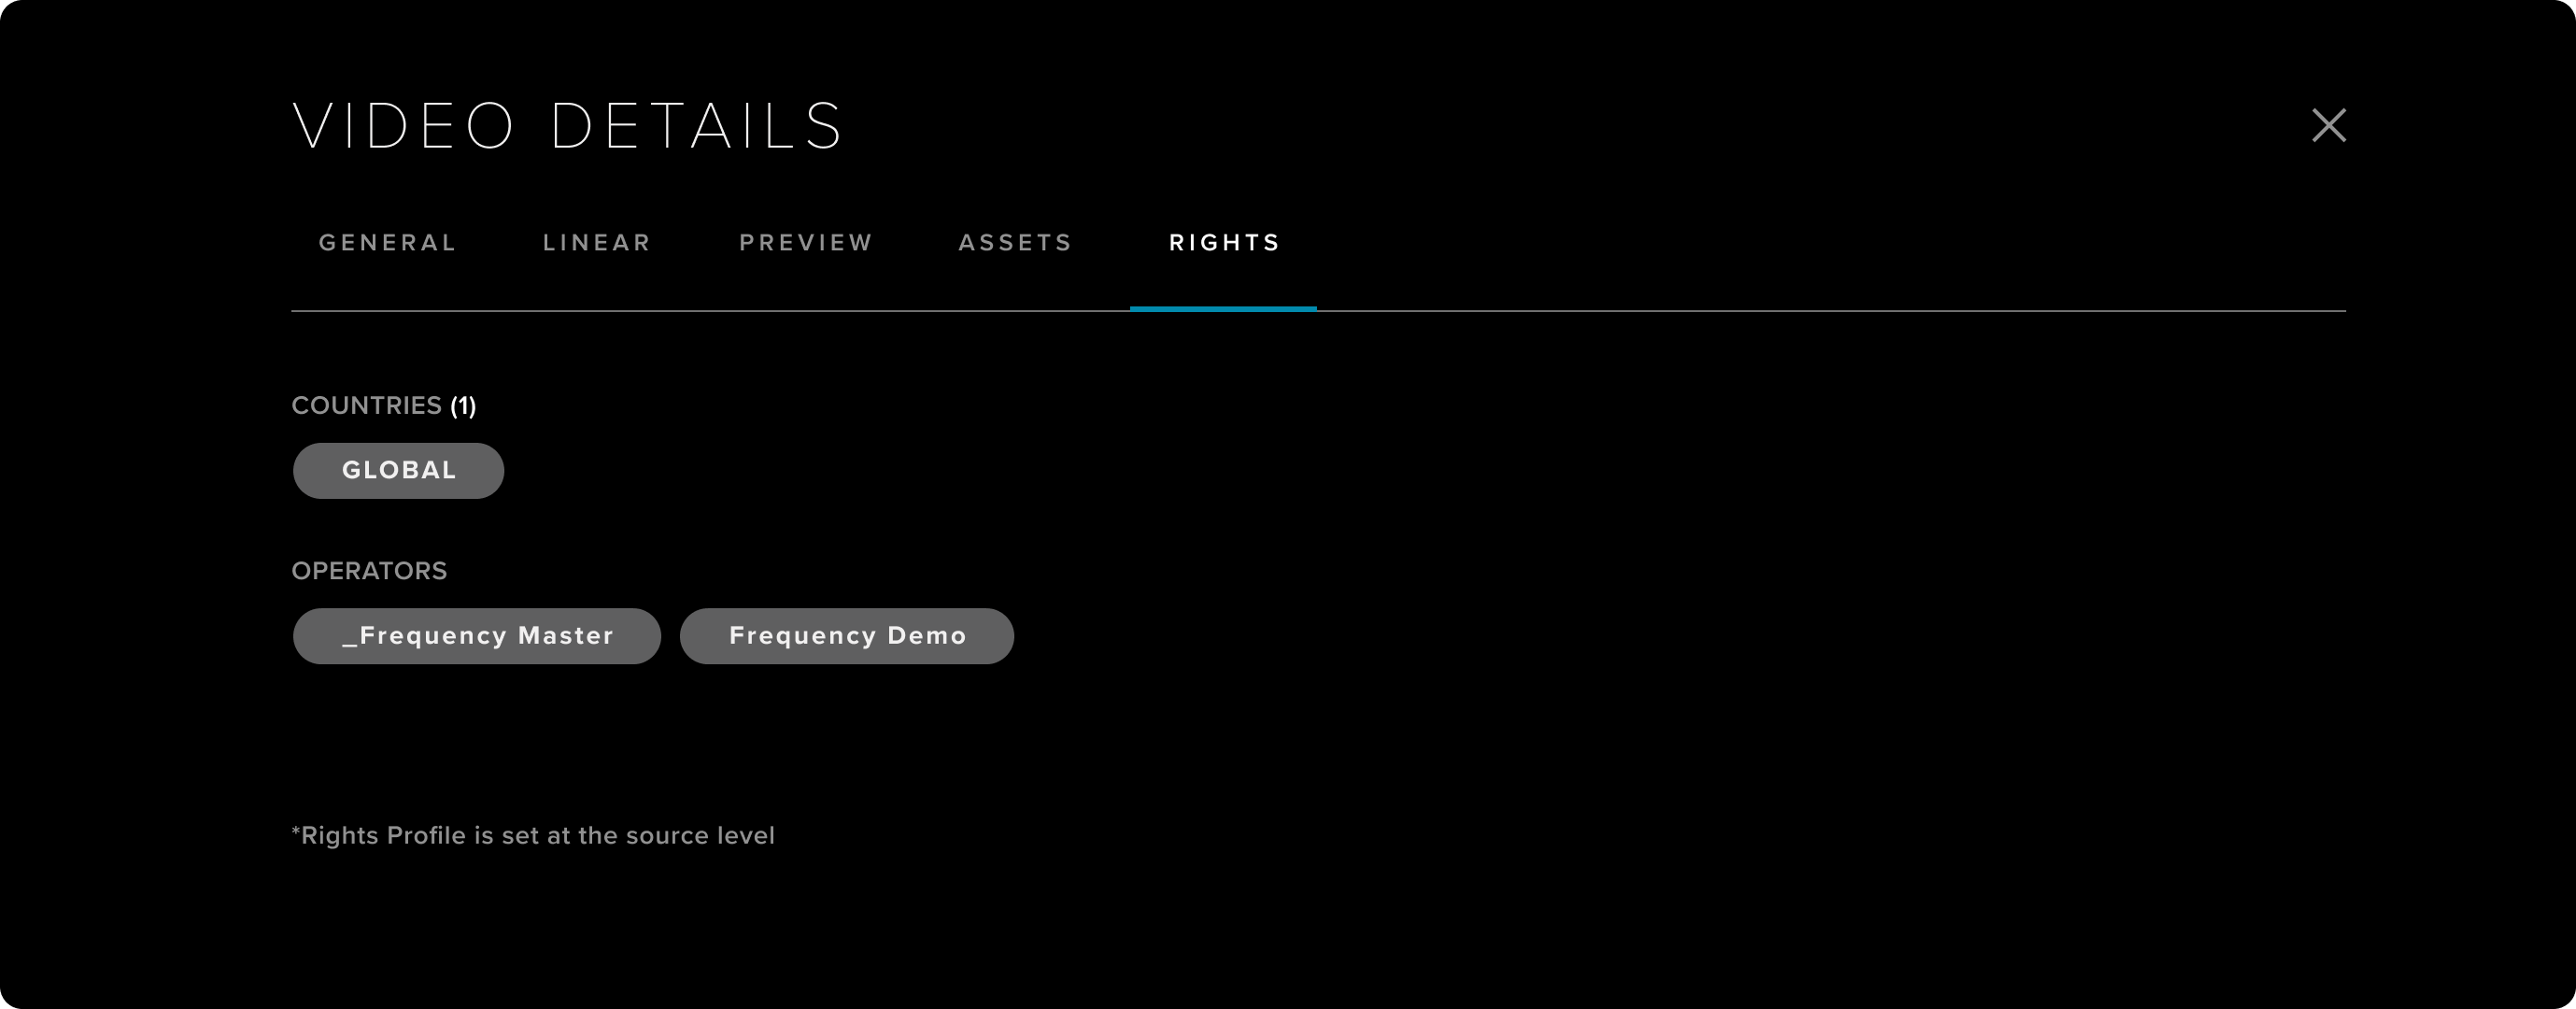
Rights
This section lets the user review the video's distribution rights as configured for the Source that the video belongs. The rights profile for the Source is managed in the ACCOUNT tool.
Uploading Videos
Uploading videos from the MANAGE tool allows for the manual ingestion of videos as an alternative to backend options such as MRSS feeds, servers, etc. Videos uploaded are validated, transcoded, and prepared for distribution.
Single Video Upload
To upload a video, you can first select a Brand by clicking on the Brand on the left side of the main screen. Under the Brand's profile details, click on the Upload Video button.

Select Rights profile. For most users, this will just be your account name. If you have rights restrictions on content for VOD distribution, you can configure multiple rights profiles to reflect those in ACCOUNT.
Upload video. You can upload a video file from your desktop (drag or select), or enter a video URL that leads directly to the video file (often the URL will end in a file extension like .mp4). If you've selected from your desktop, it will begin to upload, but you can continue with the process; just do not close this tab until it is finished. NOTE: The limit for uploading from your desktop is 10gb.
Upload a thumbnail. By default, it will select your Brand logo, but you can cancel, and upload your own or use a direct URL.

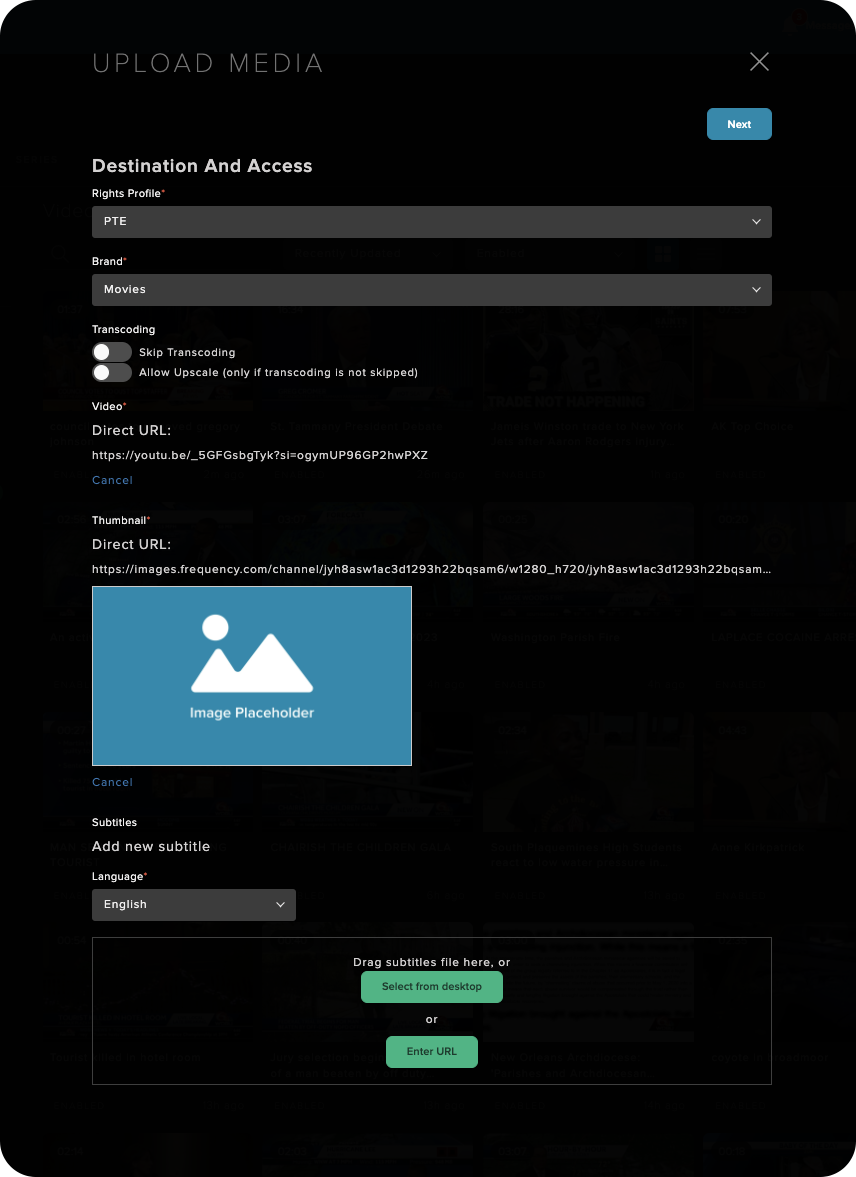
Select Next.
Enter Metadata. By default it will use the file names for title and description, and pass through Brand metadata as default values. If you wish, you can finish here and begin transcoding the video and you can edit metadata later. Otherwise, please add metadata for each field. Only the ones with red stars are required. Please see Metadata Definitions for more information on each field.
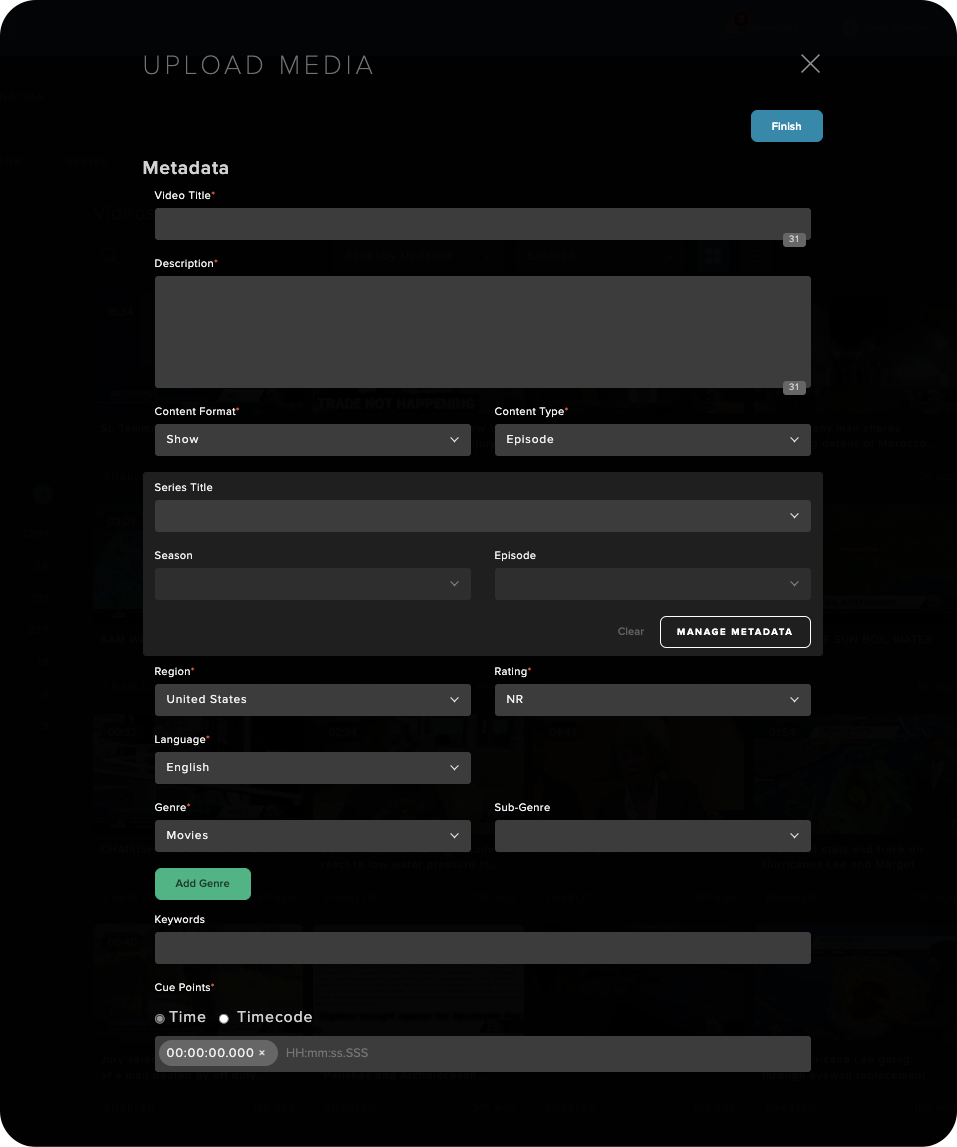
Select Finish. If you selected automatically approve, it will begin transcoding as soon as it is finished uploading, otherwise, you can select the check mark below the video in the grid view to approve. It will appear in your main video library as soon as it is finished. If it does not, check your drafts to see if it encountered any errors.
Linear Programs
In order to schedule a video into a linear channel, you must first create a “linear program” that includes both the video file and events. This creates a “timed” version of the video that can be used for scheduling into linear channels. Events are defined as ad pods or time stretch.
Creating Linear Programs
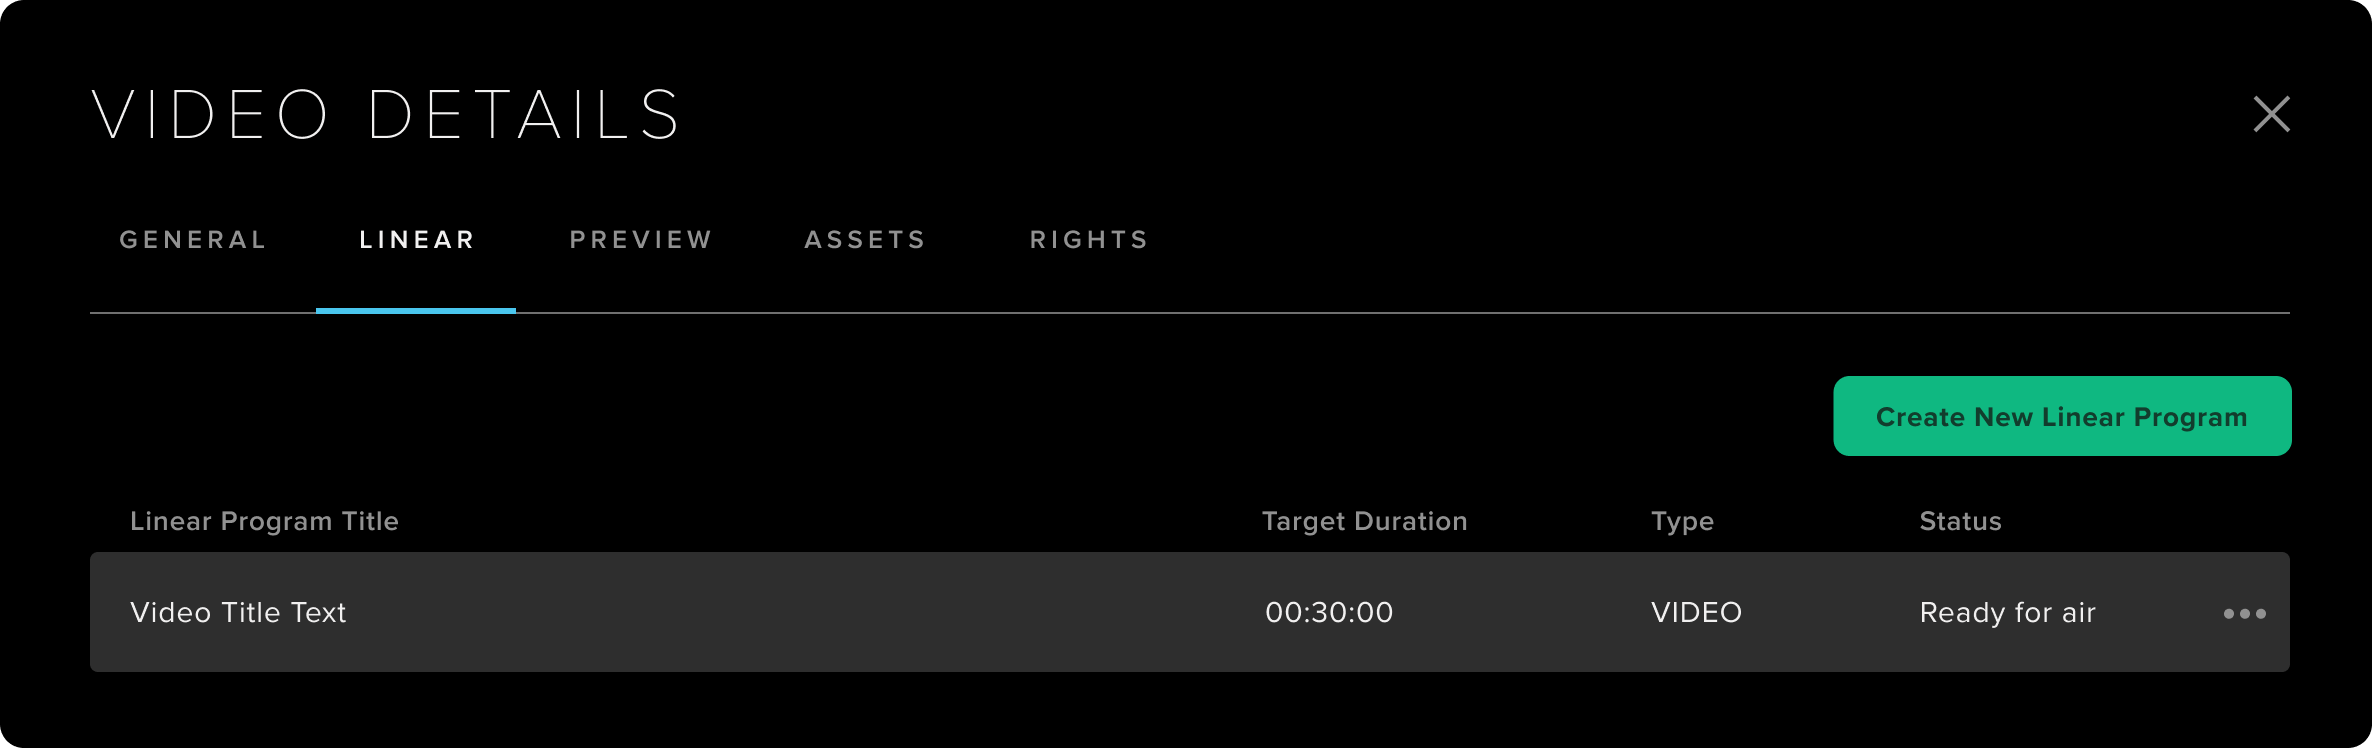
Step 1: In the Video Details modal, select Linear from the Video Details modal, and then click Create New Linear Program.
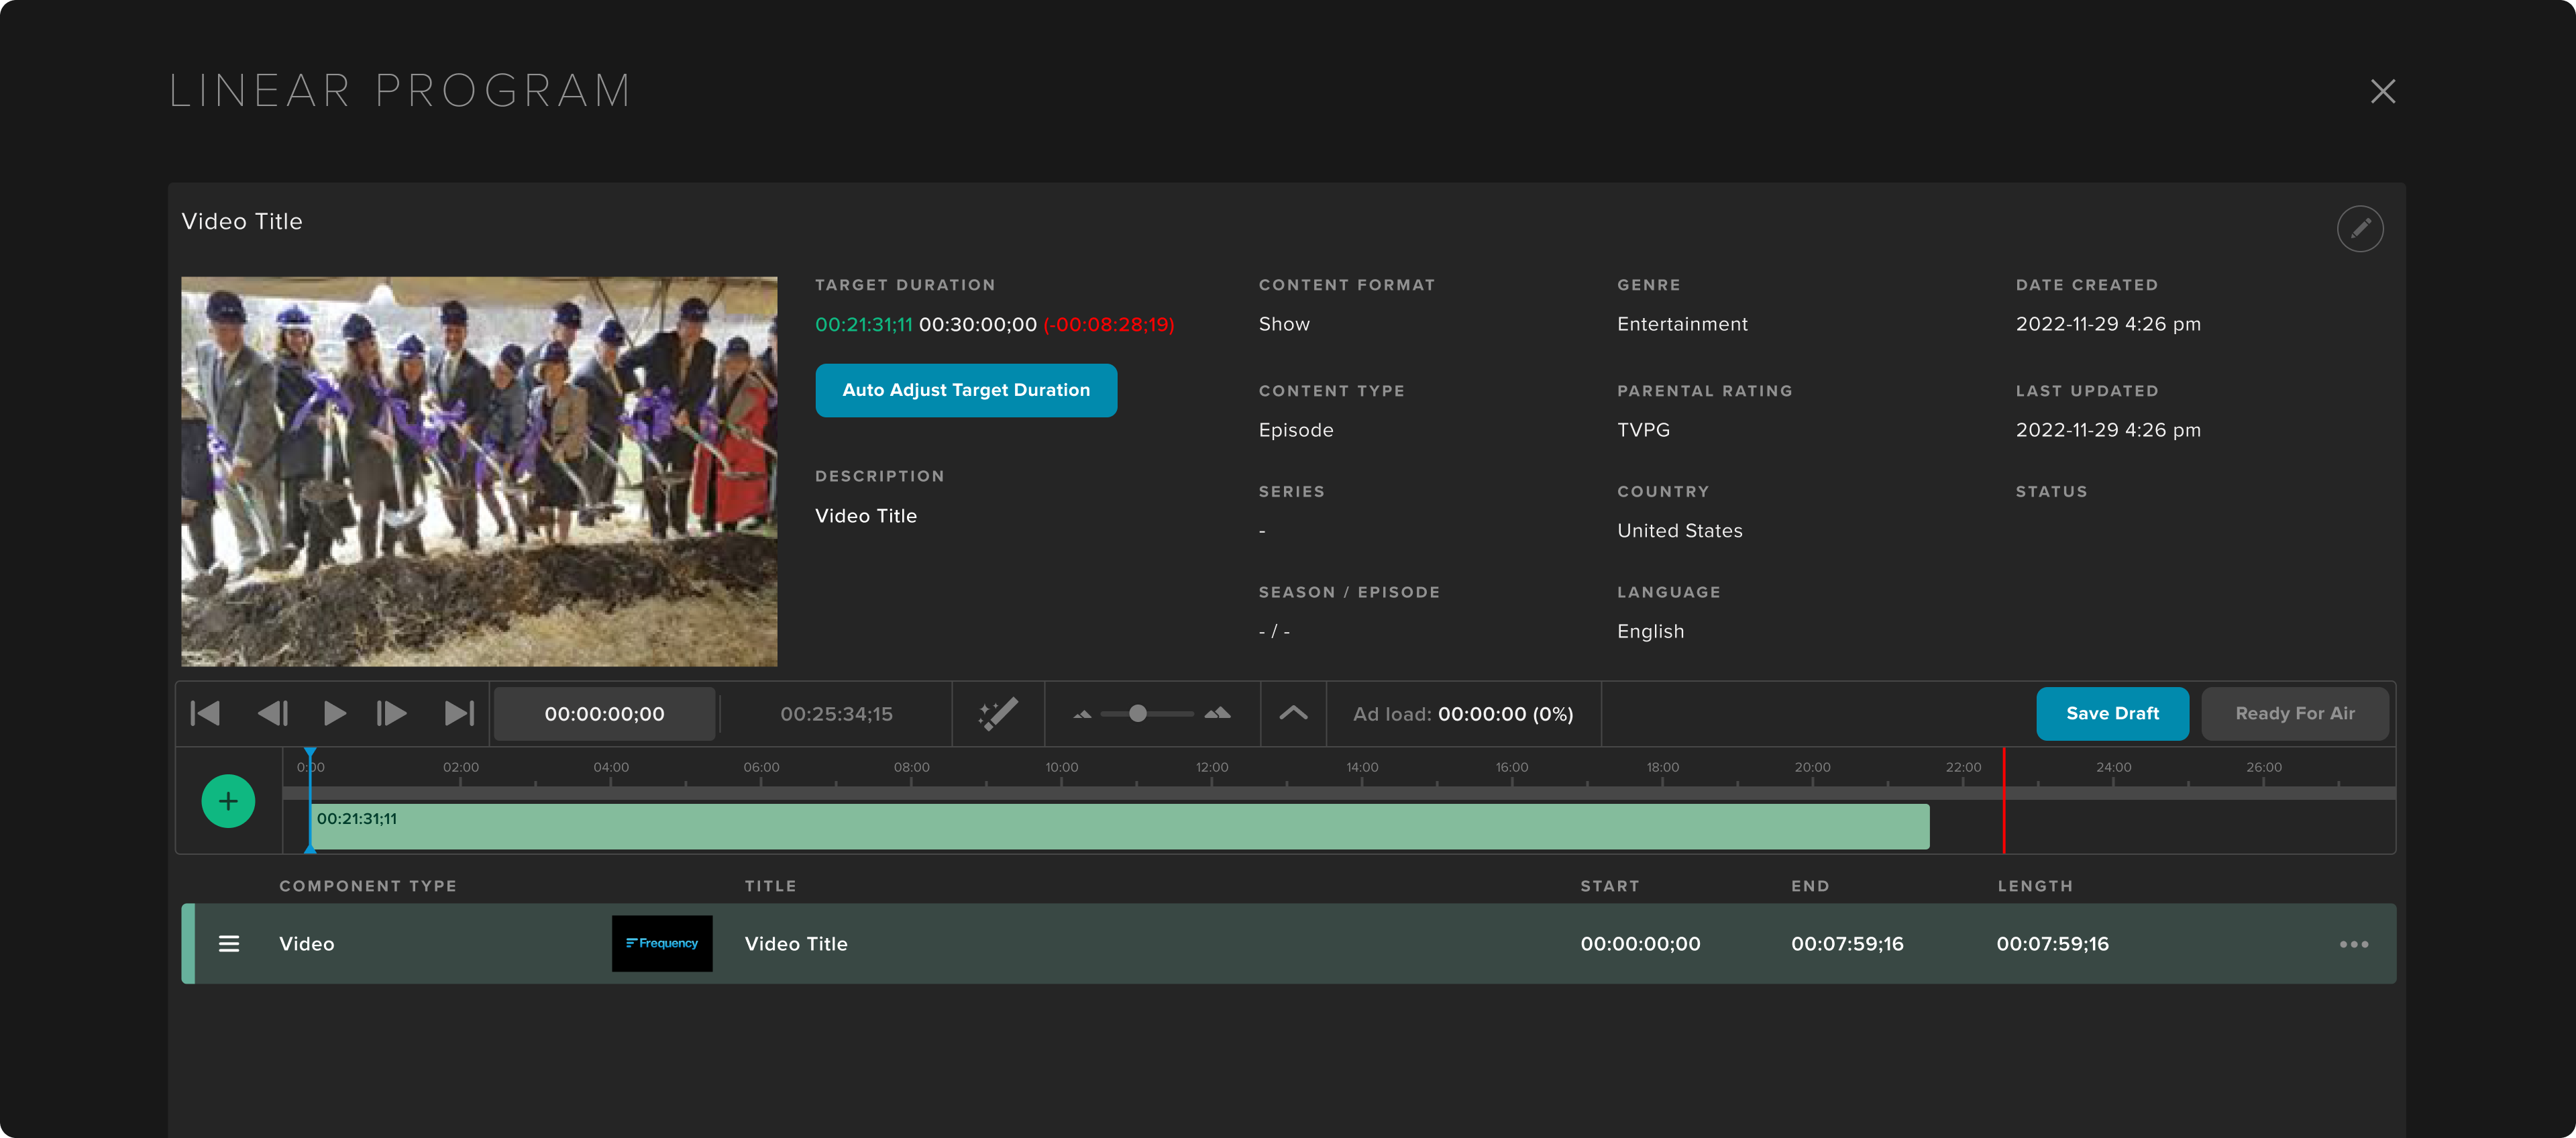
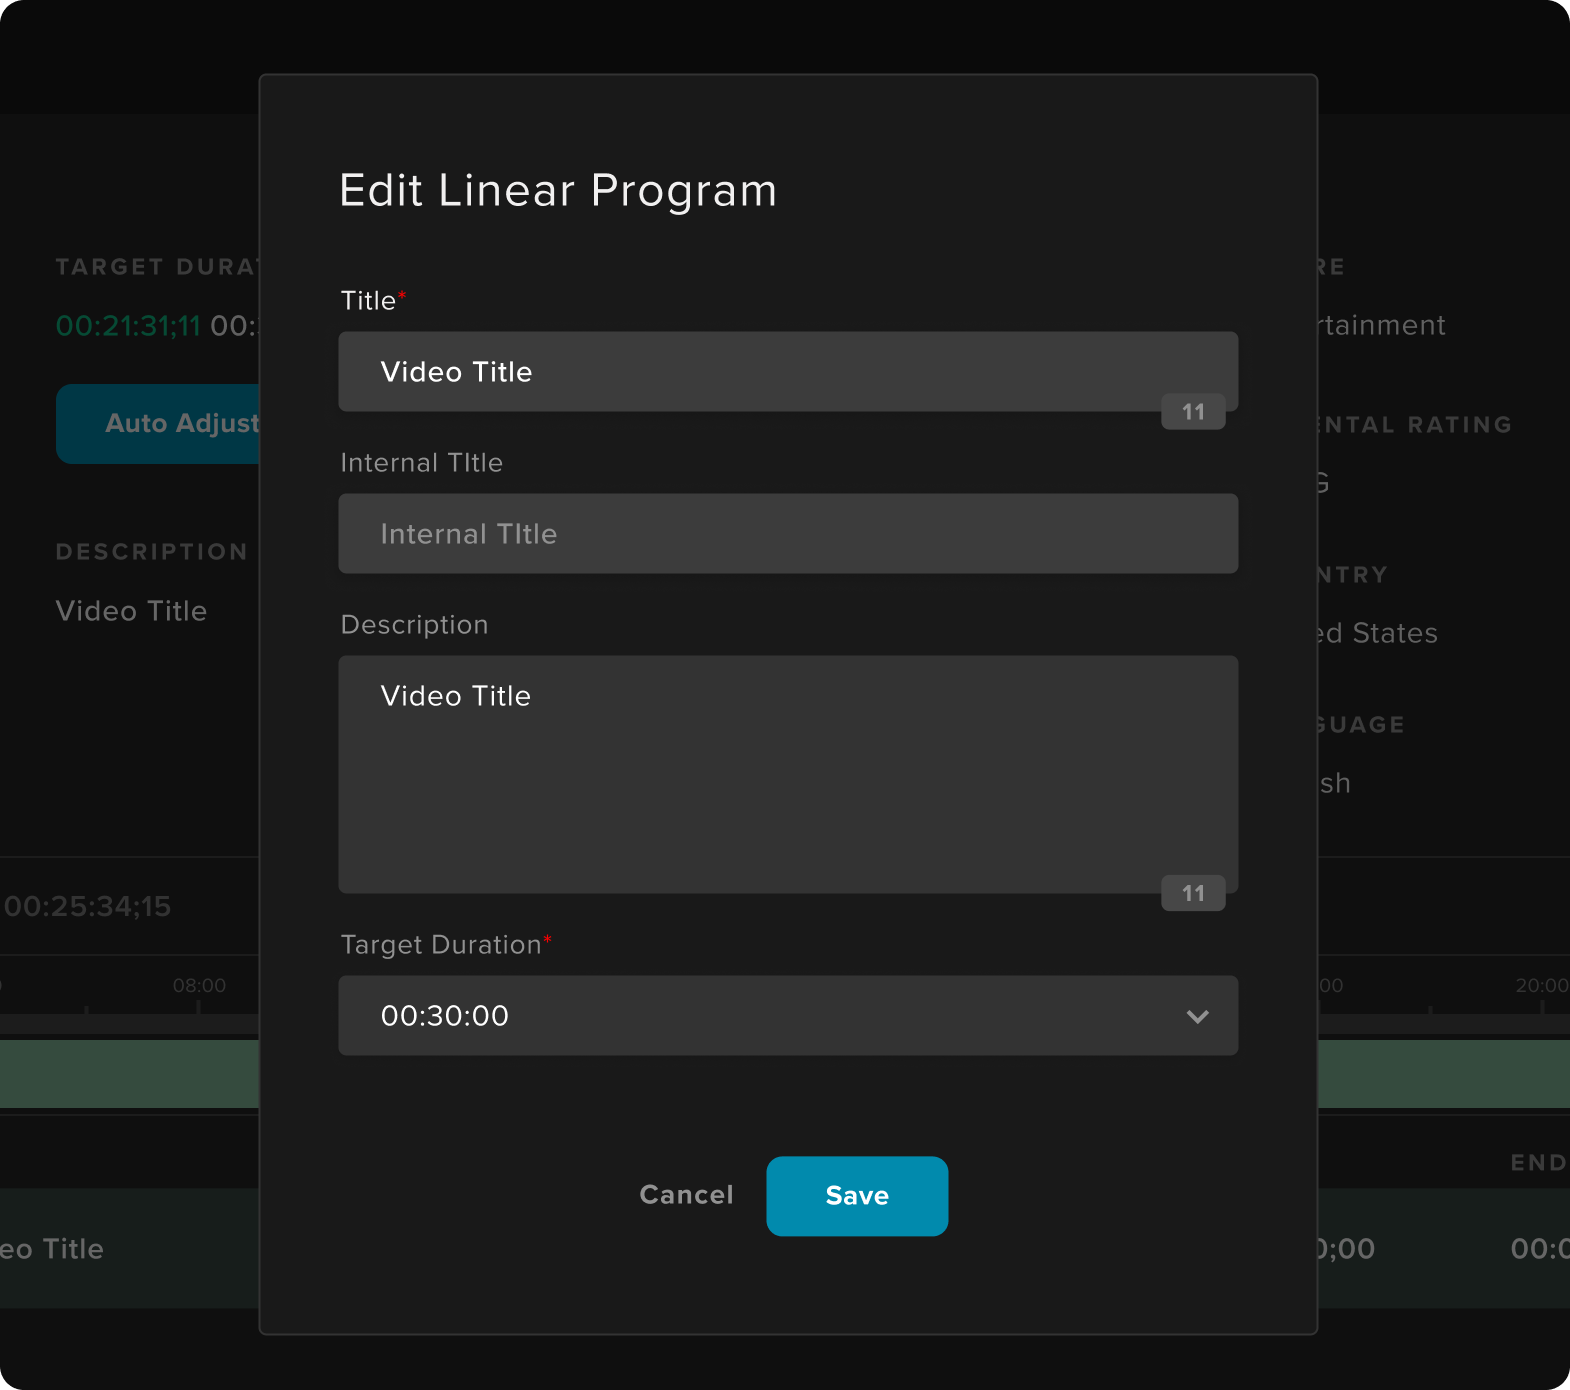
If you are not satisfied with the Target Duration or the Linear Program Title automatically generated from your video, click on the Pencil icon in the upper right corner of the Program Editor.
Modify the Linear Program Title and the Target Duration to the desired values.
This dialog allows you to customize your Linear Program Title and Target Duration. This automatically defaults to the next 30-minute increment that would occur after adding ten minutes to the current time.
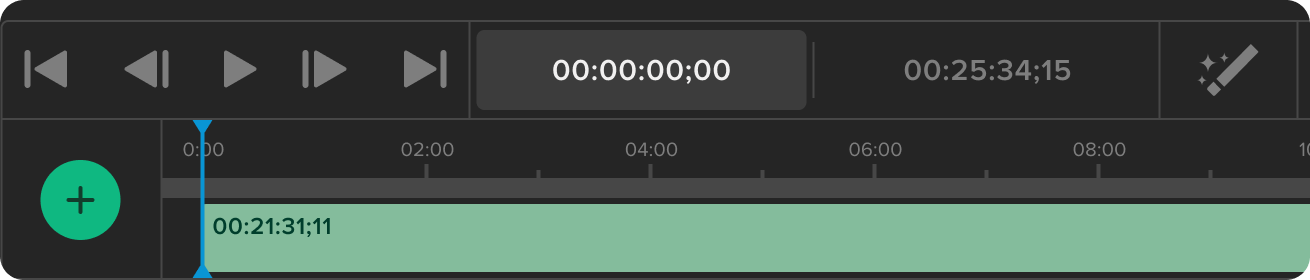
Advance the play-head by either manually scrubbing or using the player controls.
Manual Scrubbing: You may click and drag the blue play head left and right on the video timeline.
Player Controls: You may use the player controls to advance or go back the previous frame or previous video component.
Once you’ve selected the place where you want to add an event, go to Step 4.
To add an Ad Pod or a Time Stretch event, click on the Add (“+”) icon. This will open the Ad Pod, Time Fill, Static Interstitial, and Dynamic Interstitial drop-down menu
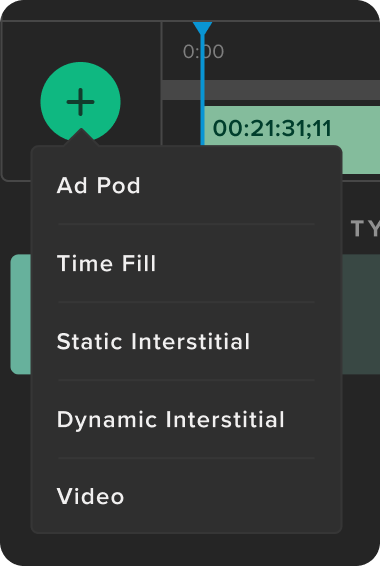
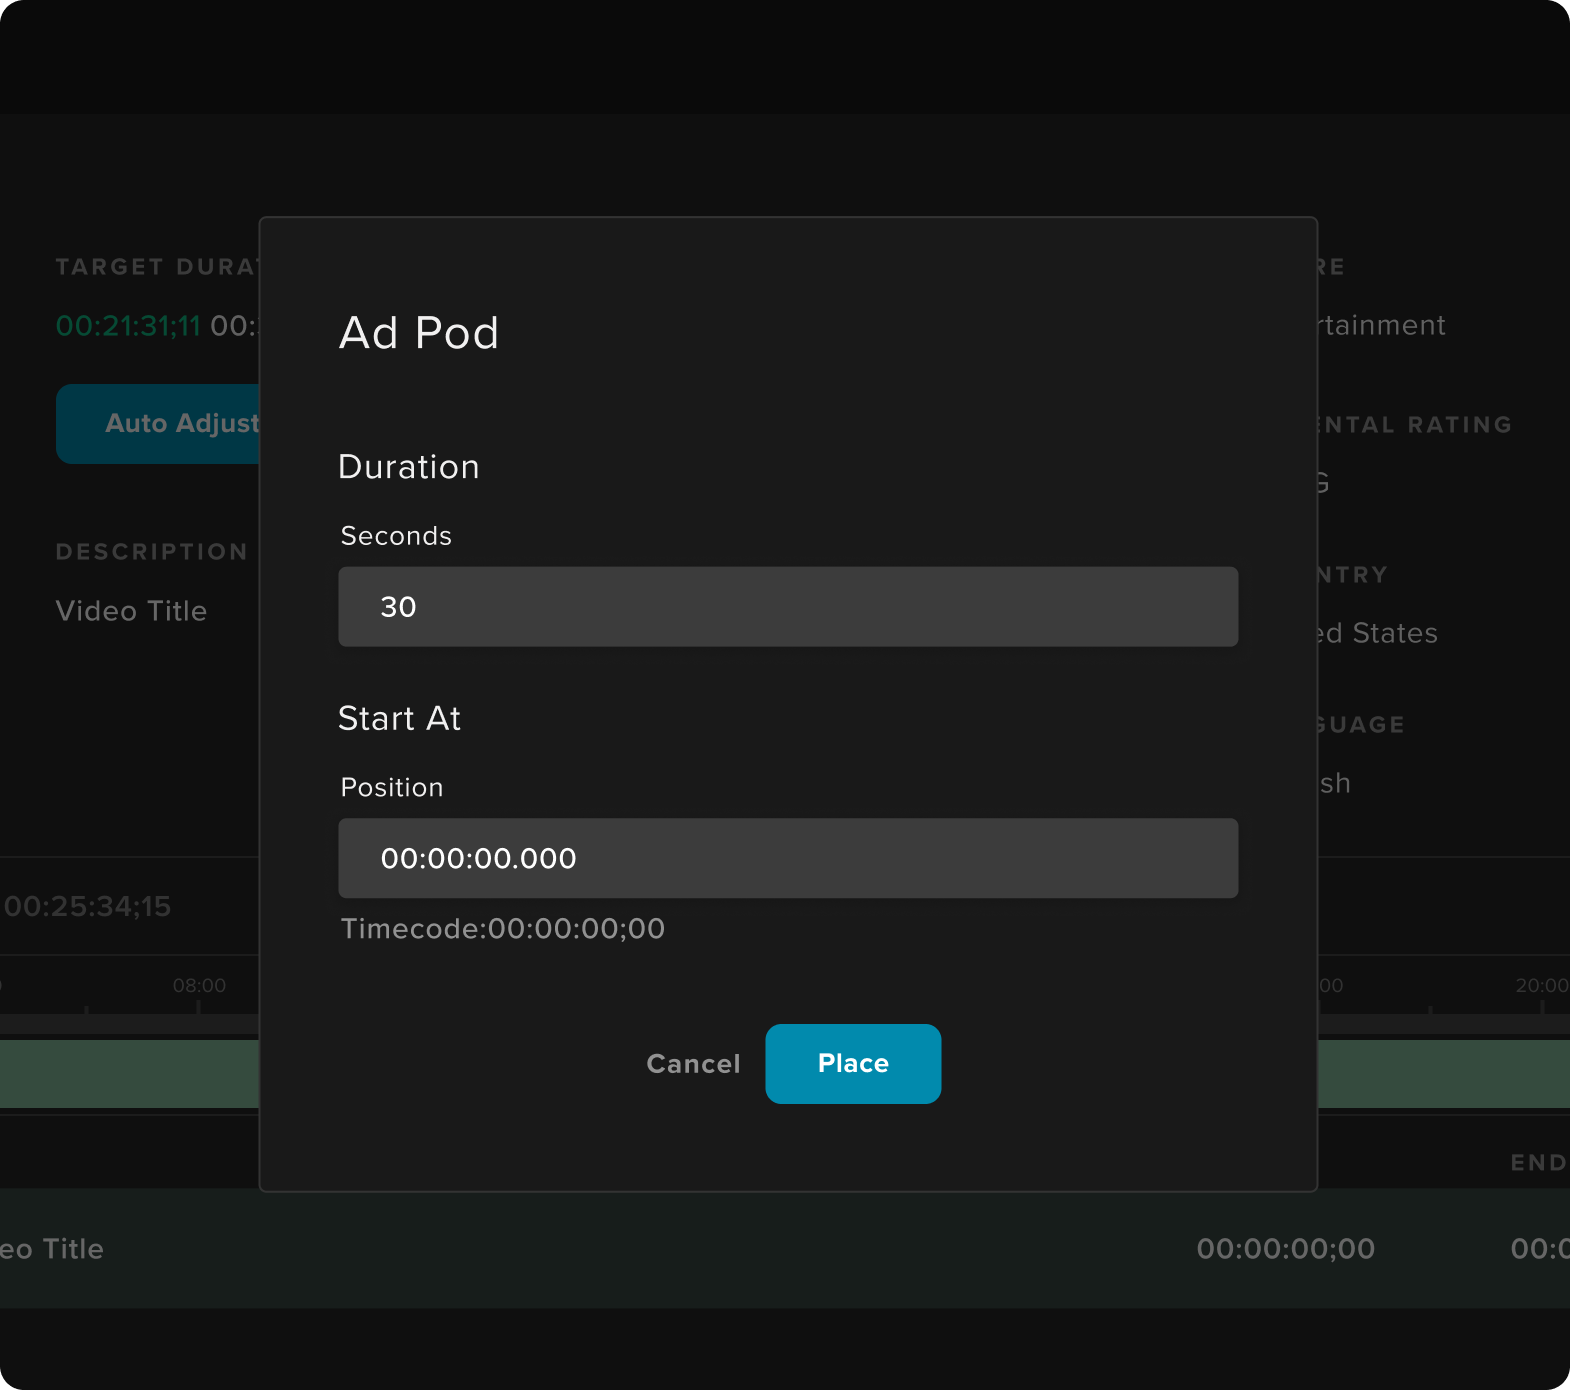
The Ad Pod dialog will open.
You will be able to set ad pod duration in 30 second increments up to 180 seconds. The “Start At” position will be the position you scrubbed to in the video timeline.
Using this dialog screen, you are able to manually set the starting position of the ad pod using SMPTE timecode. By default, the timecode is already pre-selected based on the selection in the linear program’s play-head position.
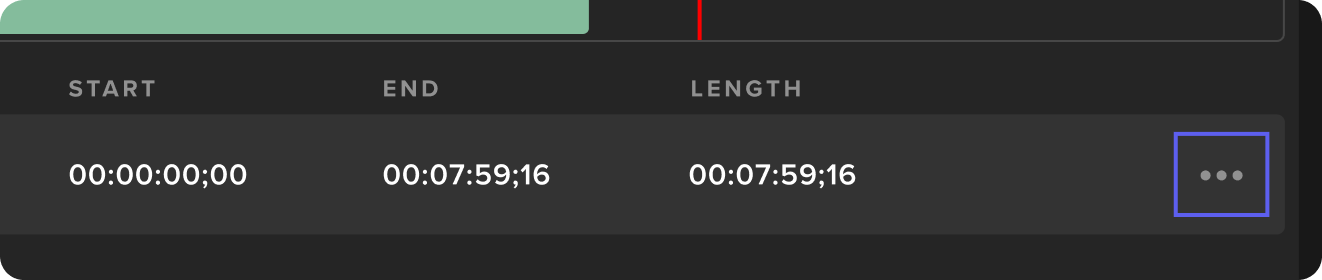
To edit or remove existing ad pods, double-click within the ad pod or click on the three dots icon at the end of the ad pod in the list below the video timeline.
If the program you’ve created is within 30 seconds of the program’s Target Duration, you may use the Magic Wand to automatically fill in the gap with a Time Stretch event.
Time Stretch can be added manually at any time and placed anywhere on the timeline.
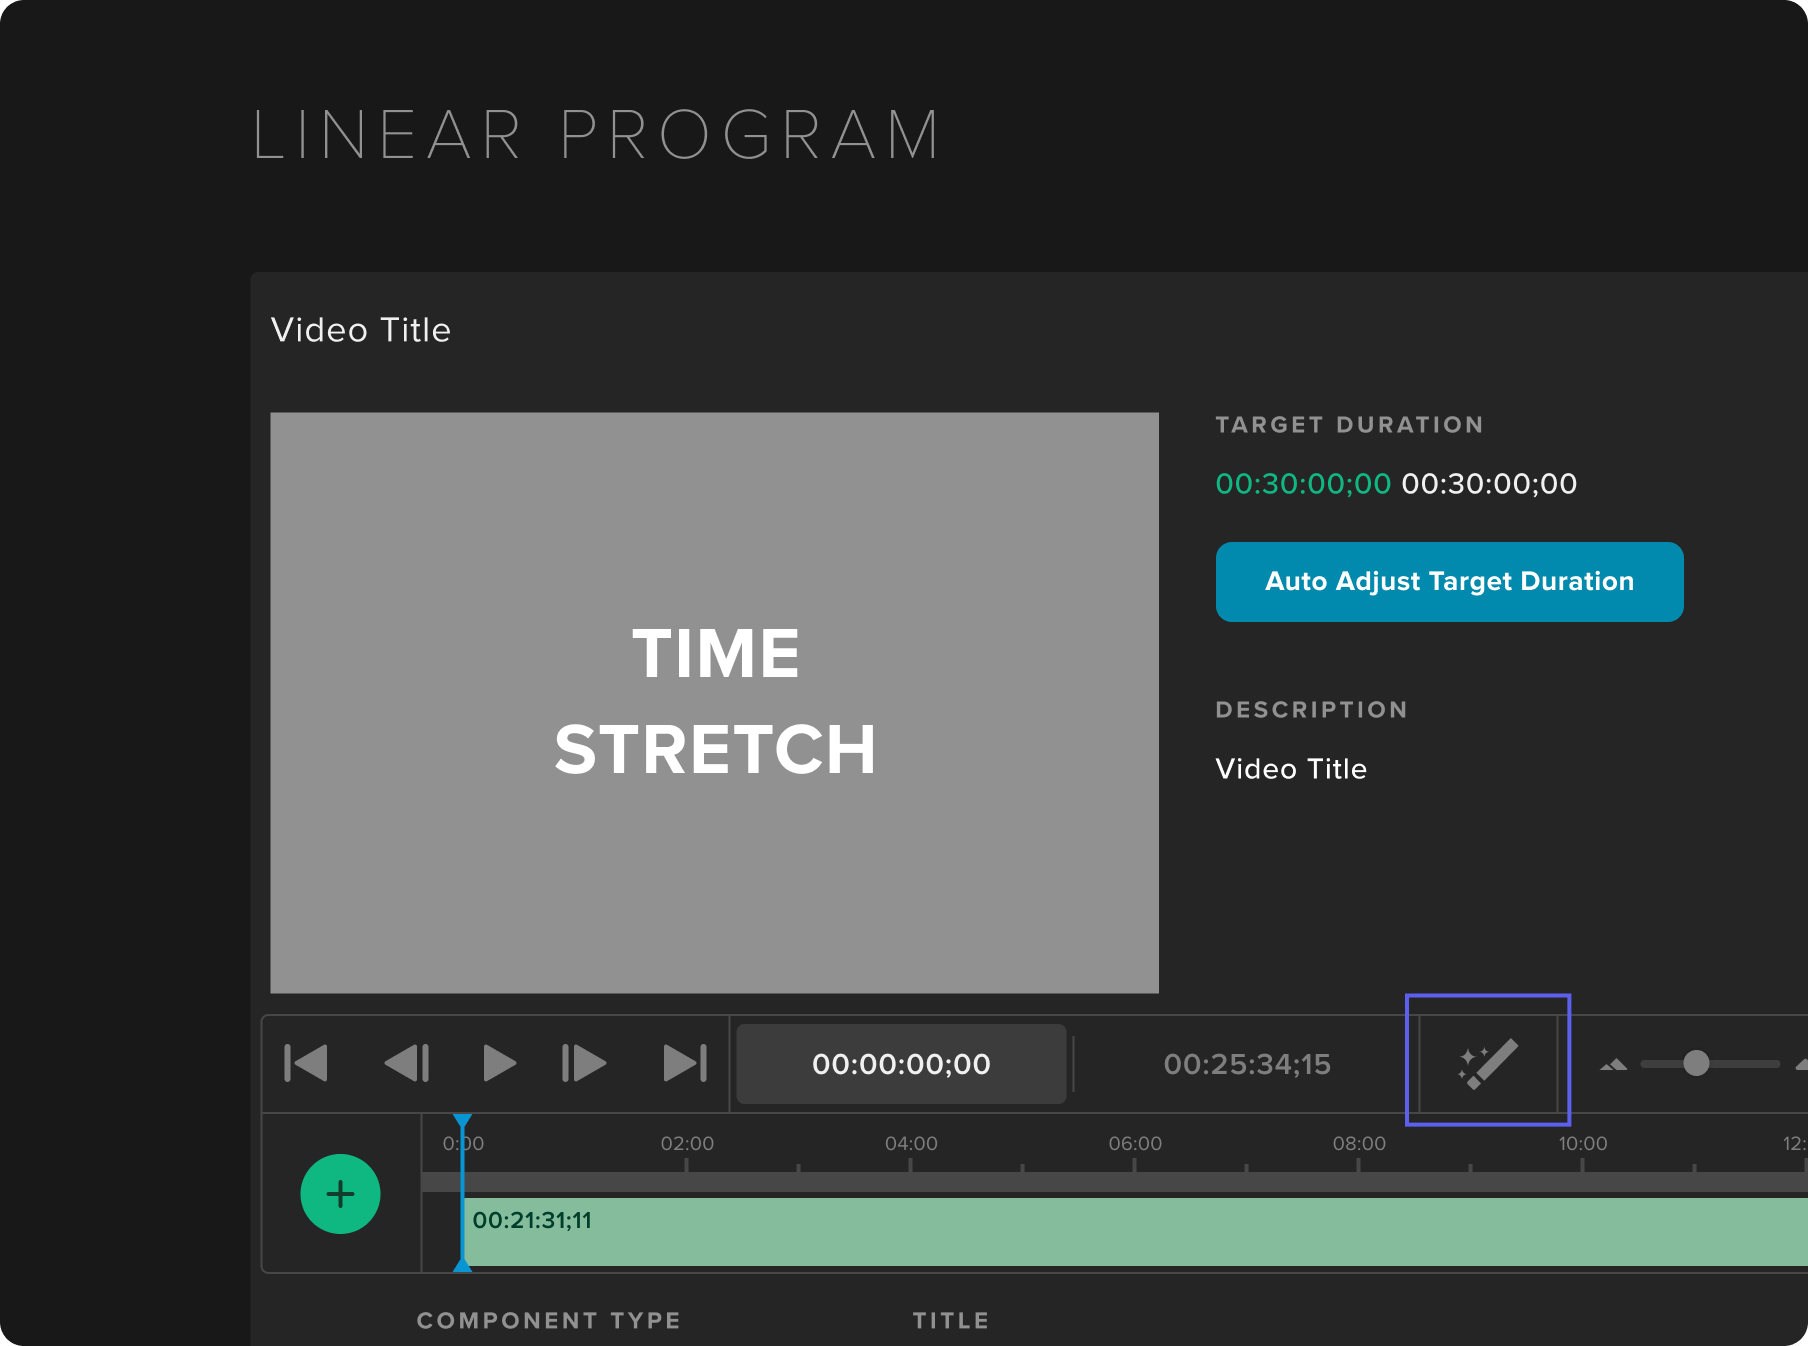
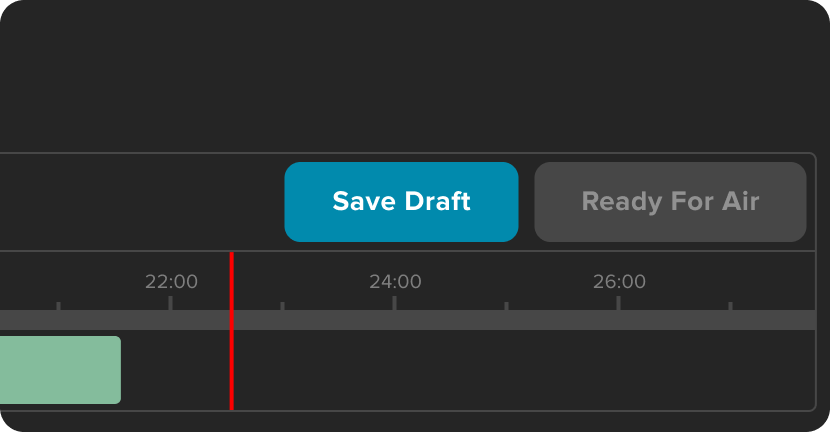
If your program’s Target Duration and timeline match, the “Ready for Air” button will turn blue.
Click on “Ready for Air” and your linear program will be marked “Ready for Air” and will be available for you to schedule in a Linear Channel.
Note: You can save a program as “Draft” at any time for editorial purposes and schedule it on a linear channel. However, “Draft” linear programs will not be scheduled for playout. A fallback programming experience will occur in the event of a “Draft” appearing in a schedule at the time of airing.
Managing Existing Linear Programs
To manage existing programs, click on the Linear Program record within the Linear Tab of the Video Details modal. This will open the Linear Program modal that allows the user to make changes to the selected Linear Program. Editing the Linear Program is the same as when a new Linear Program is created.
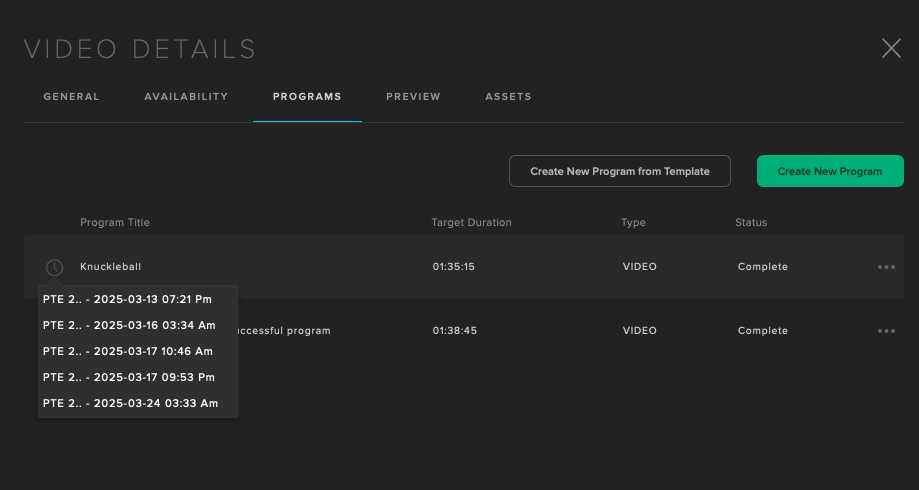
Viewing Scheduled Programs
Programs that are currently scheduled will display a "clock" icon next to them in the Video Details/Programs section. By clicking this users are presented with a list of instances when that program is scheduled. When an instance is selected, it will take you to to the day/week the program is scheduled.
Support
For questions or issues for any Frequency tools, email support@frequency.com